Hub Members
Manage members
The Manage Members section provides administrators with the central tools necessary to control user access and collaboration for the specific Workspace.
- Core Management Capabilities:
- Within the Manage Members view, users have the functionality to:
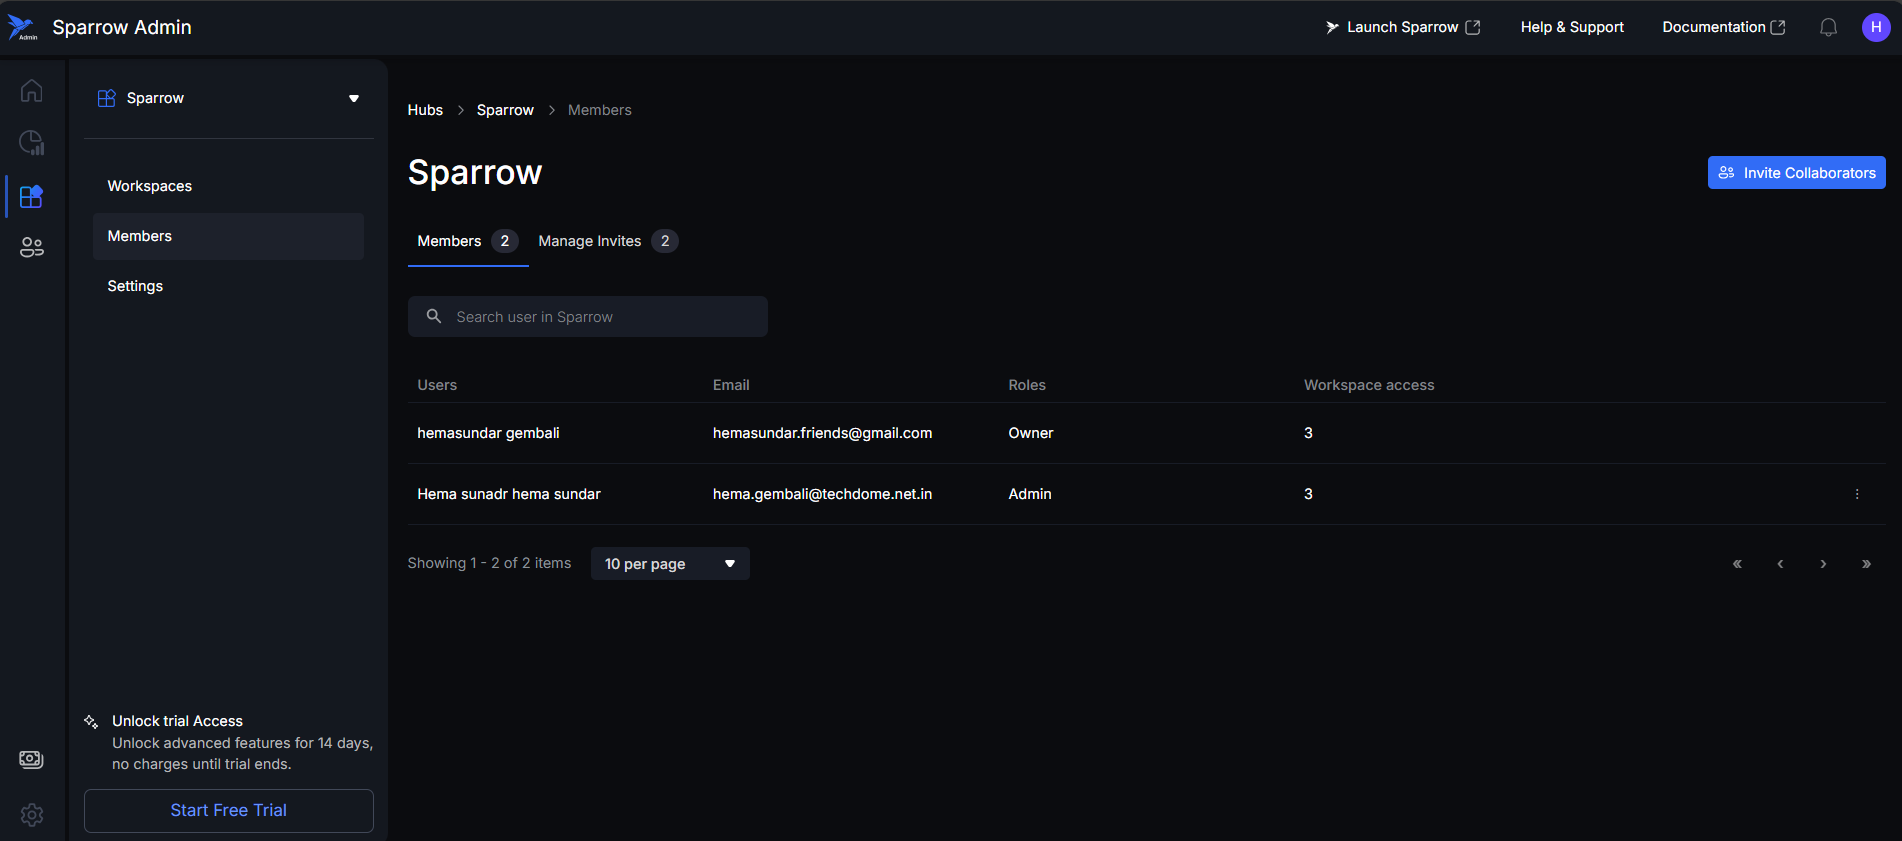
- View Members: See the comprehensive list and details of all current members/users.
- Search Members: Use the search bar to locate existing users quickly.
- Add New Collaborators: Initiate the process to invite new team members to the Hub or Workspace.
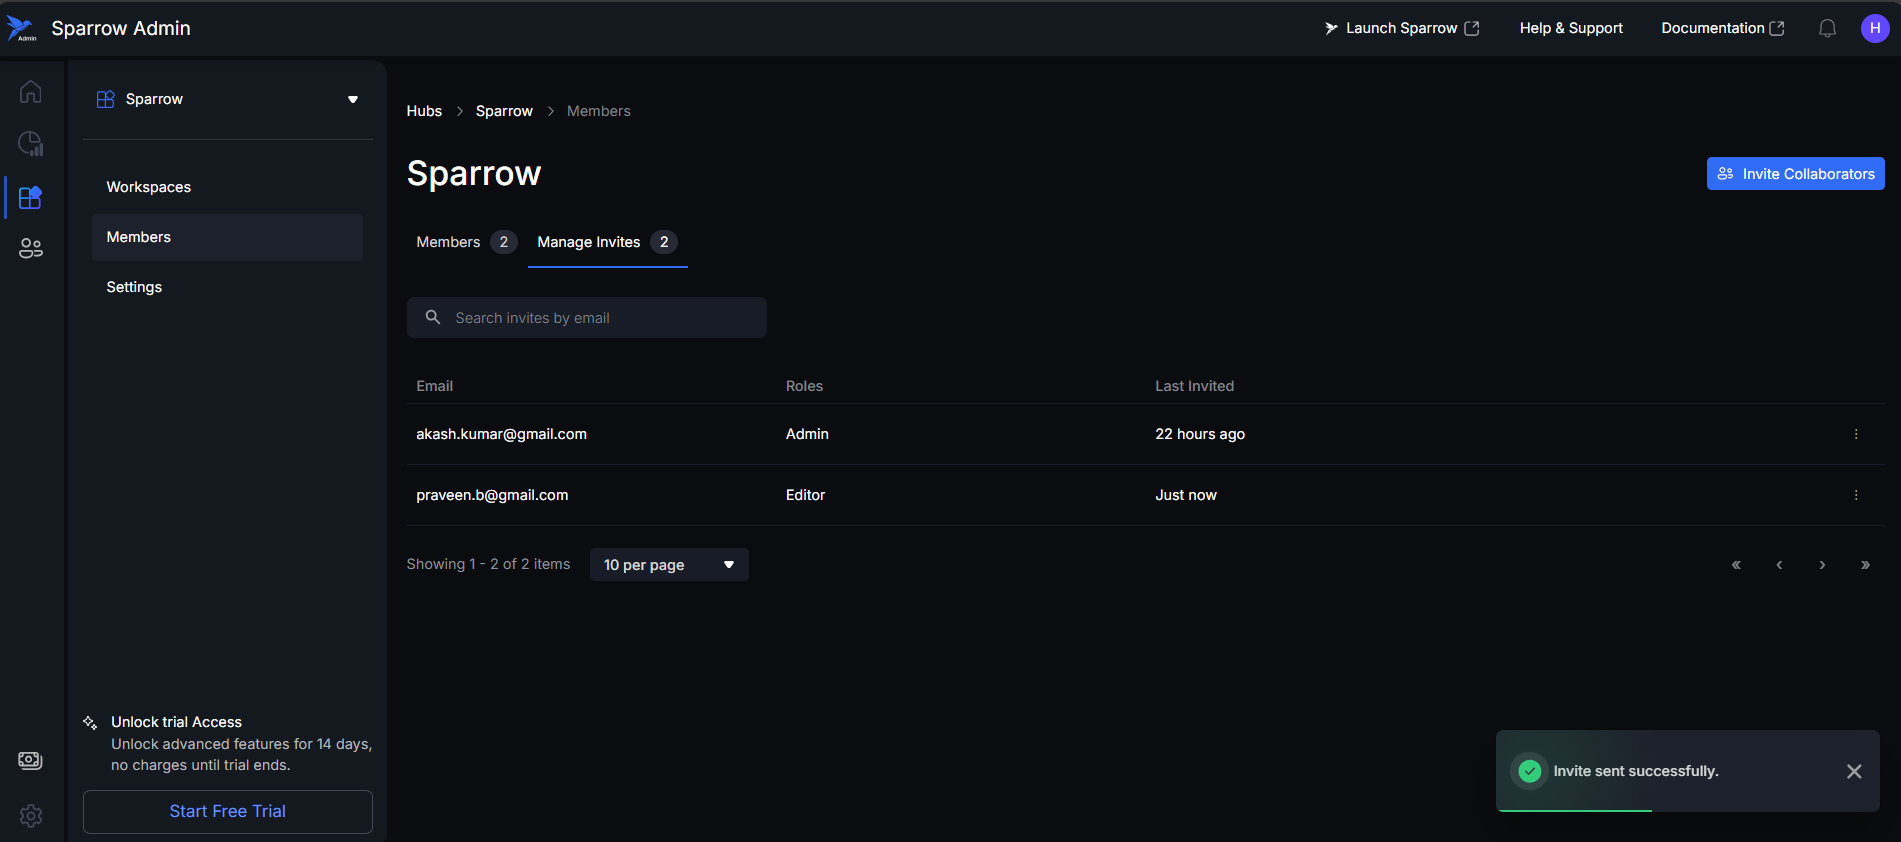
- Manage Invites: All invitations sent to collaborators will be displayed, allowing for tracking and management of pending access requests.
- Within the Manage Members view, users have the functionality to:
Steps to open the Manage members:
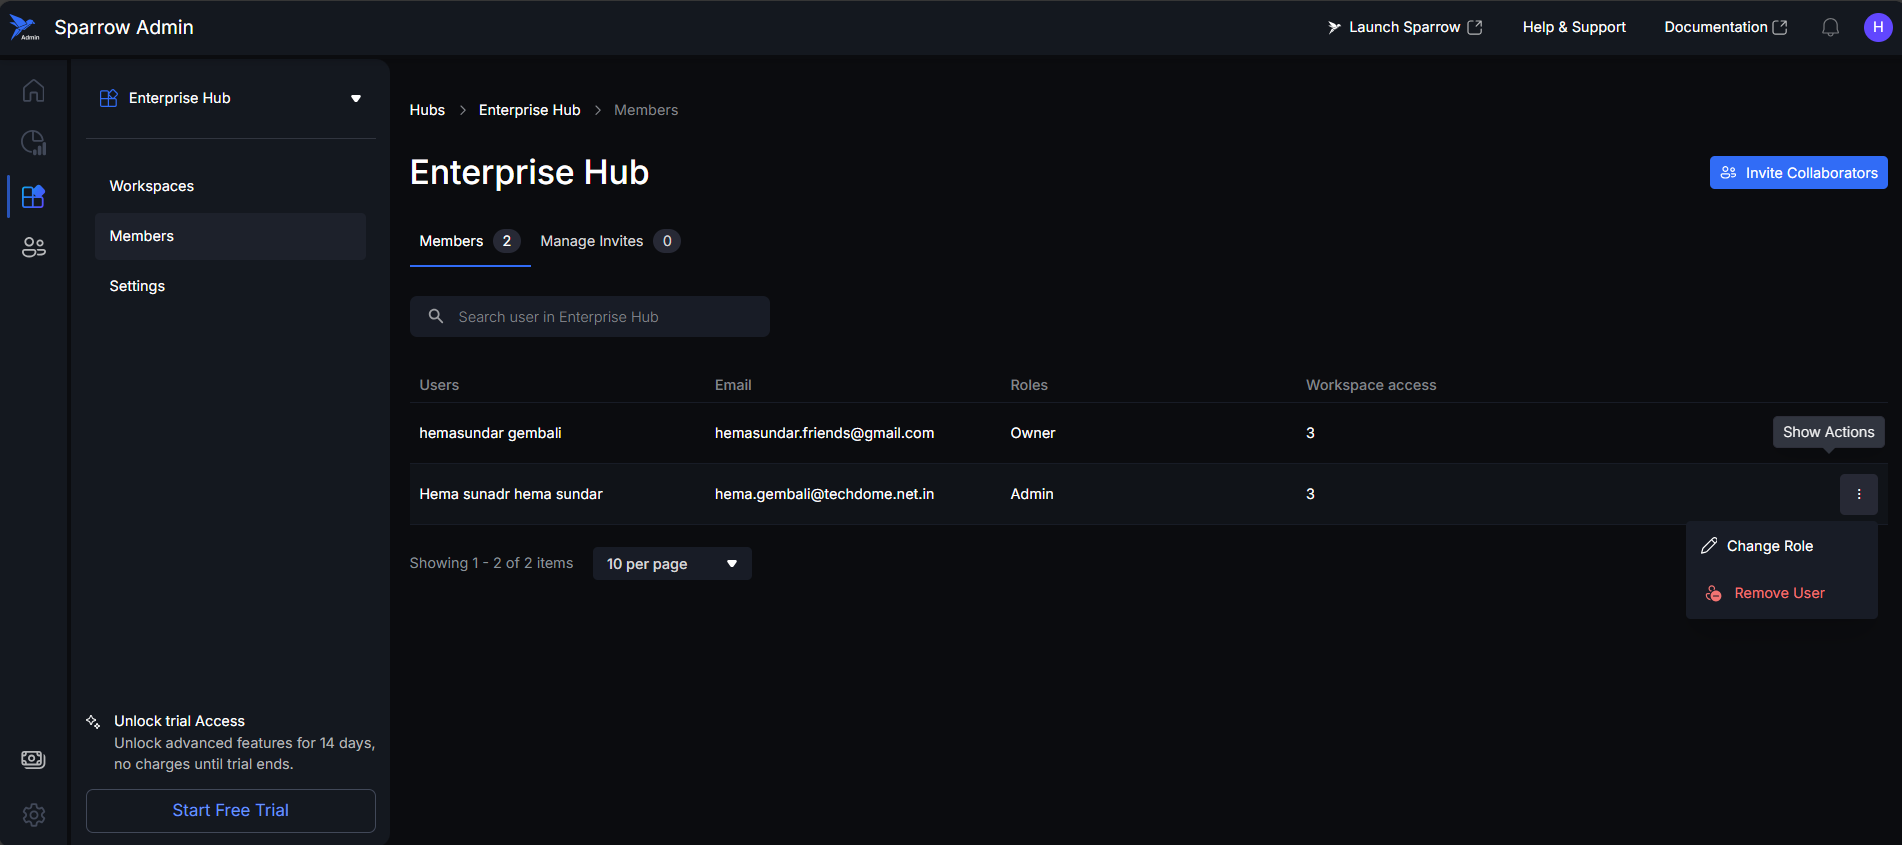
Step 1: To view the list of users associated with a specific workspace, you must first navigate to the desired Hub and then select that particular workspace. Click on the 3 dot Menu to see the available options. Click on Manage members.
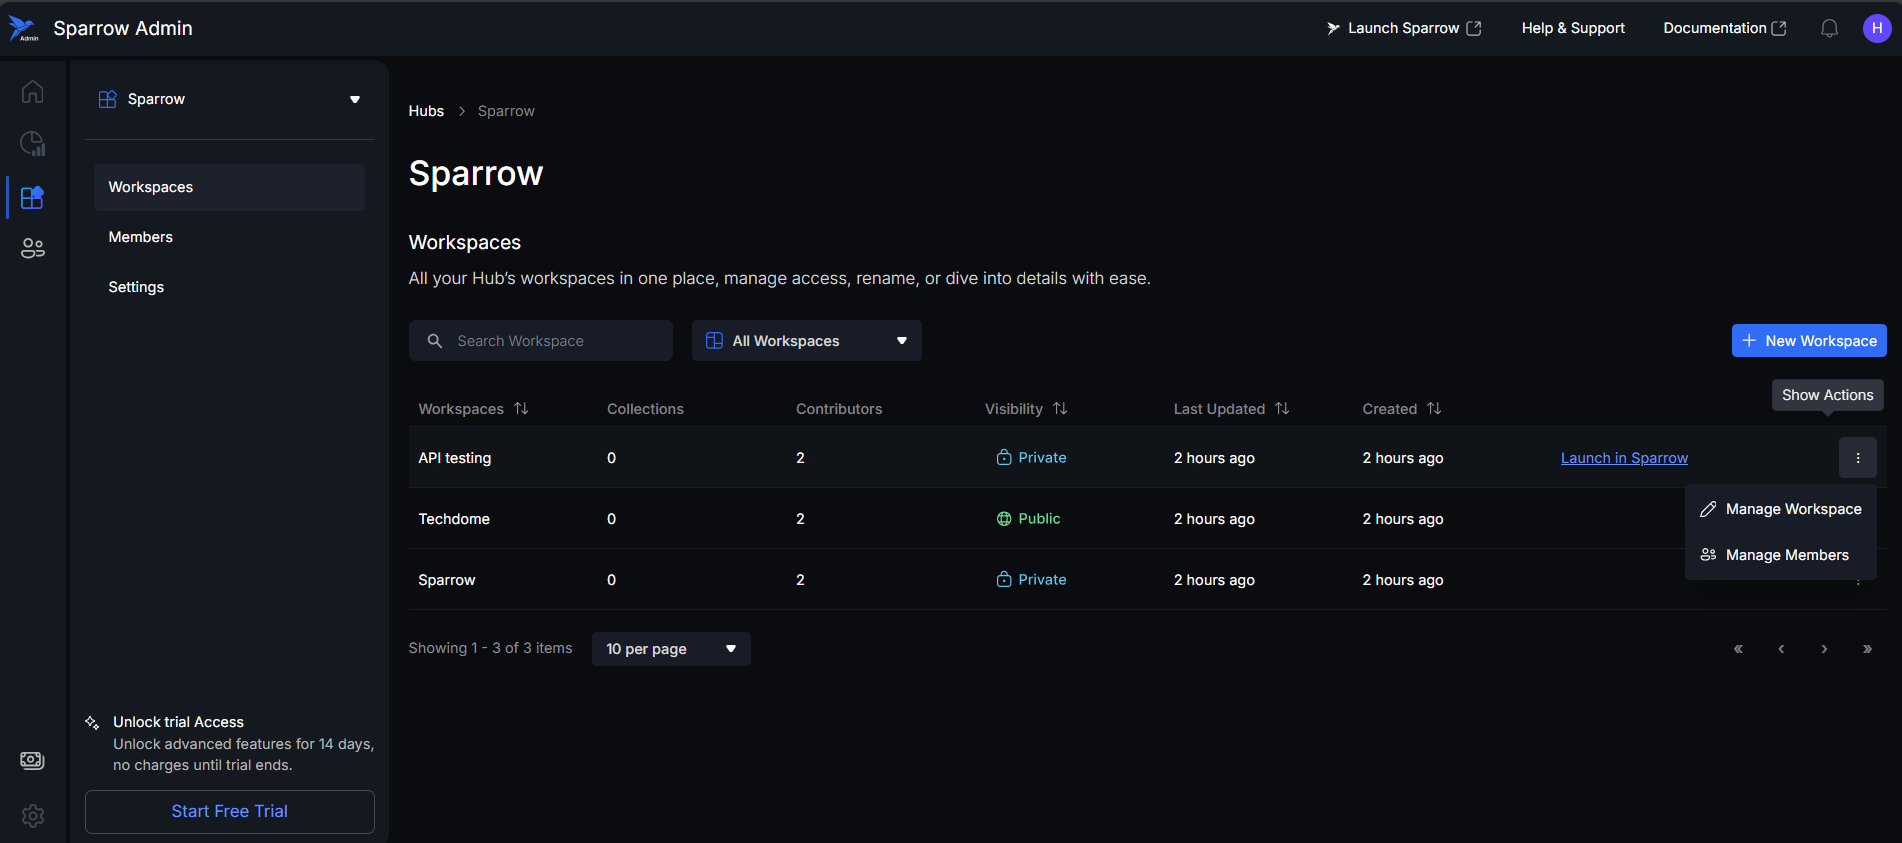
Step 2: You are directed towards the Manage Members section. users will have the functionality to search, add new collaborators, view members, and manage invites. All the invites the user has sent to collaborators will be displayed.
Inviting Collaborators
The Invite Collaborators button allows administrators to invite new users to the Hub or Workspace.
Access and Limitations
- Access Location: This button is found in the Manage Members section.
- Plan Limitations: The ability to invite collaborators is restricted by the current Hub's Subscription Plan.
- If the maximum number of contributors for the current plan is reached, the "Invite Collaborators" button will be replaced by an "Upgrade" button, prompting the user to upgrade to a higher plan to add more members.
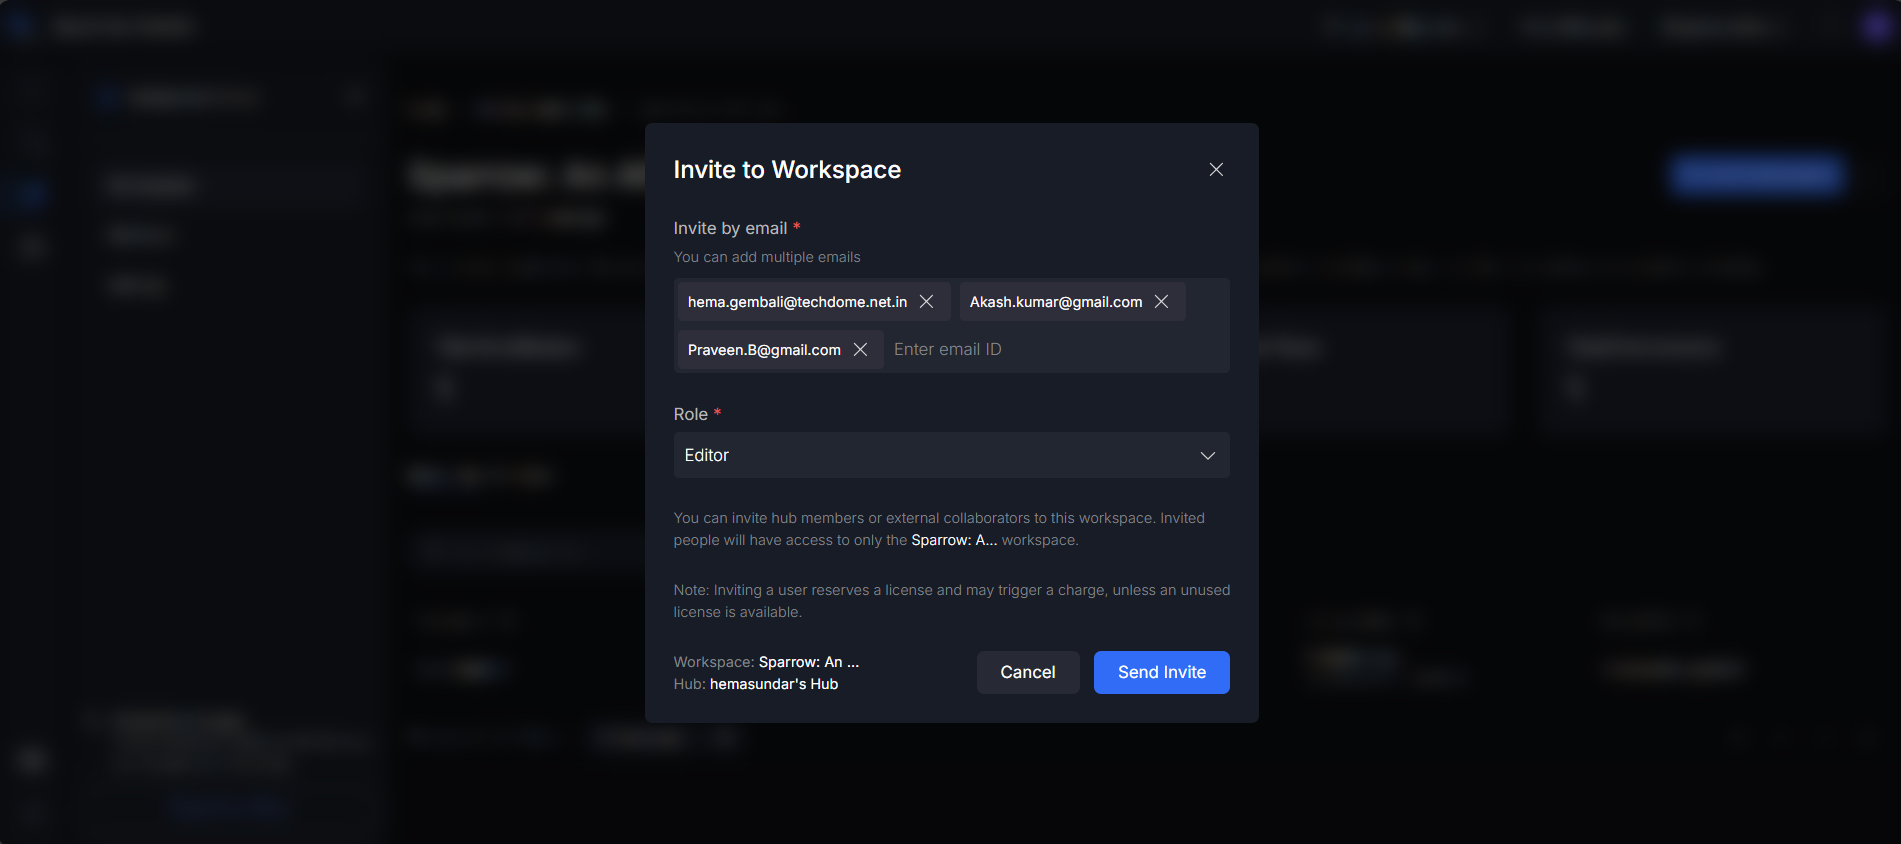
Step 1: Click on Invite Collaborators option present on the top right side of the window. A Modal appears asking details for email Id and the roles.
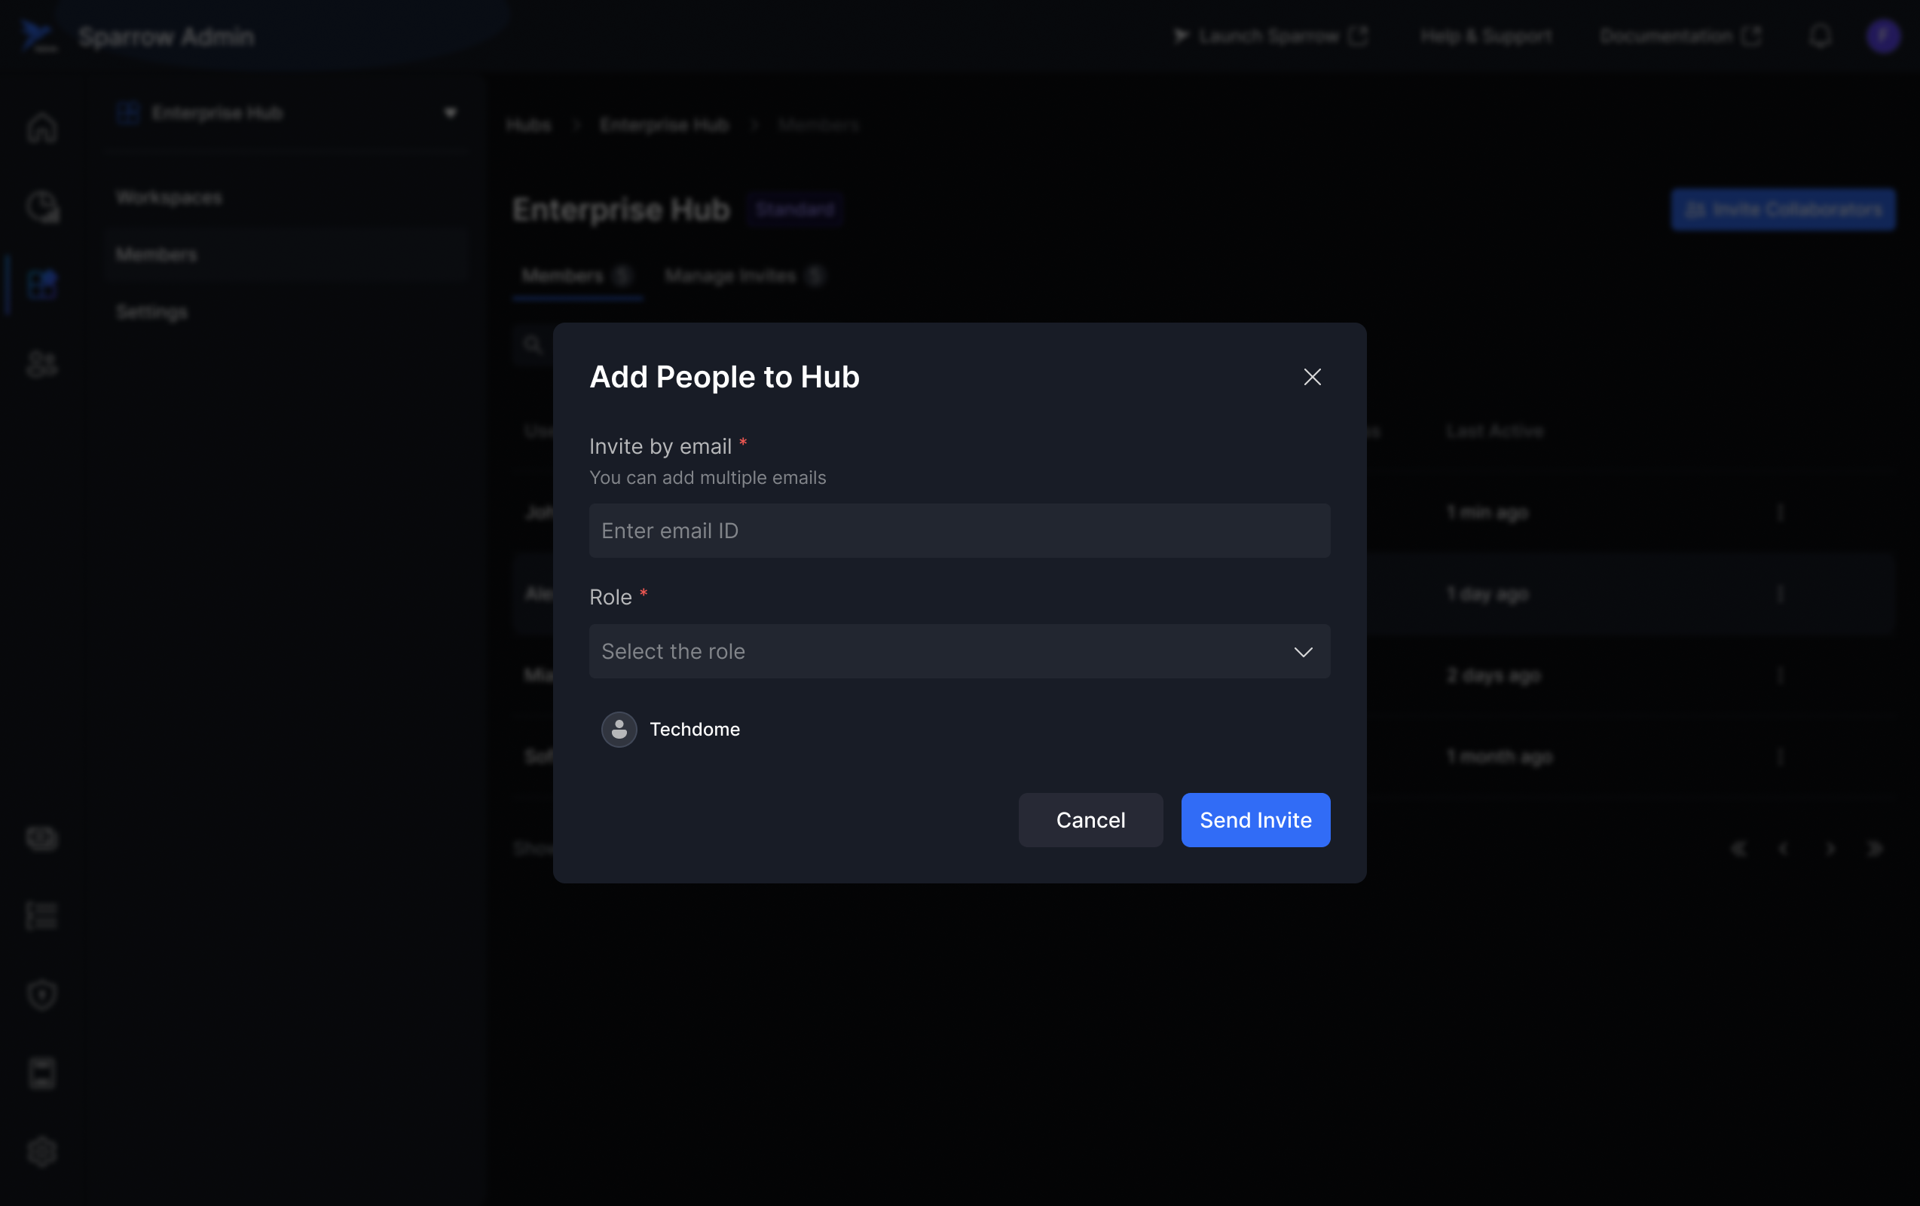
Step 2: Enter a valid email ID in the designated field and Select the user's intended role (e.g., Admin, Member) from the provided dropdown menu.
-
Roles
- Admin: A user with high-level management and administrative privileges for the Hub or the platform.
- Editor: A user with full read and write (modification) access to the content within a specific Workspace.
- Viewer: A user with read-only access to the content within a specific Workspace.
-
Caution:
- When user click on Send Invite button without entering the email we will show an error message.
- When user click on send invite without selecting the role we will show an error message.
- When user incorrect email format we will show an error message. “Please check and enter correct email address.”

Step 3: Once the user has entered the emails and selected a role, user can click the 'Send Invite' button to send the invitation.
Step 4: Invite sent successfully to the User. Toast message appeared at the bottom of the Window.
If it shows, failed to send invite. Go through all the steps and try again.

Collaborator Limits
The number of collaborators you can invite is restricted by your Hub's current Subscription Plan.
Once the maximum limit for collaborators under your current plan is reached, the "Invite Collaborators" button is replaced by an "Upgrade Plan" button.
Example: If a Hub on the Community Plan reaches its maximum limit of 5 members, the "Invite Collaborators" button will change to an "Upgrade Plan" button, prompting the user to subscribe to a higher tier to add more users.

Steps to Manage members
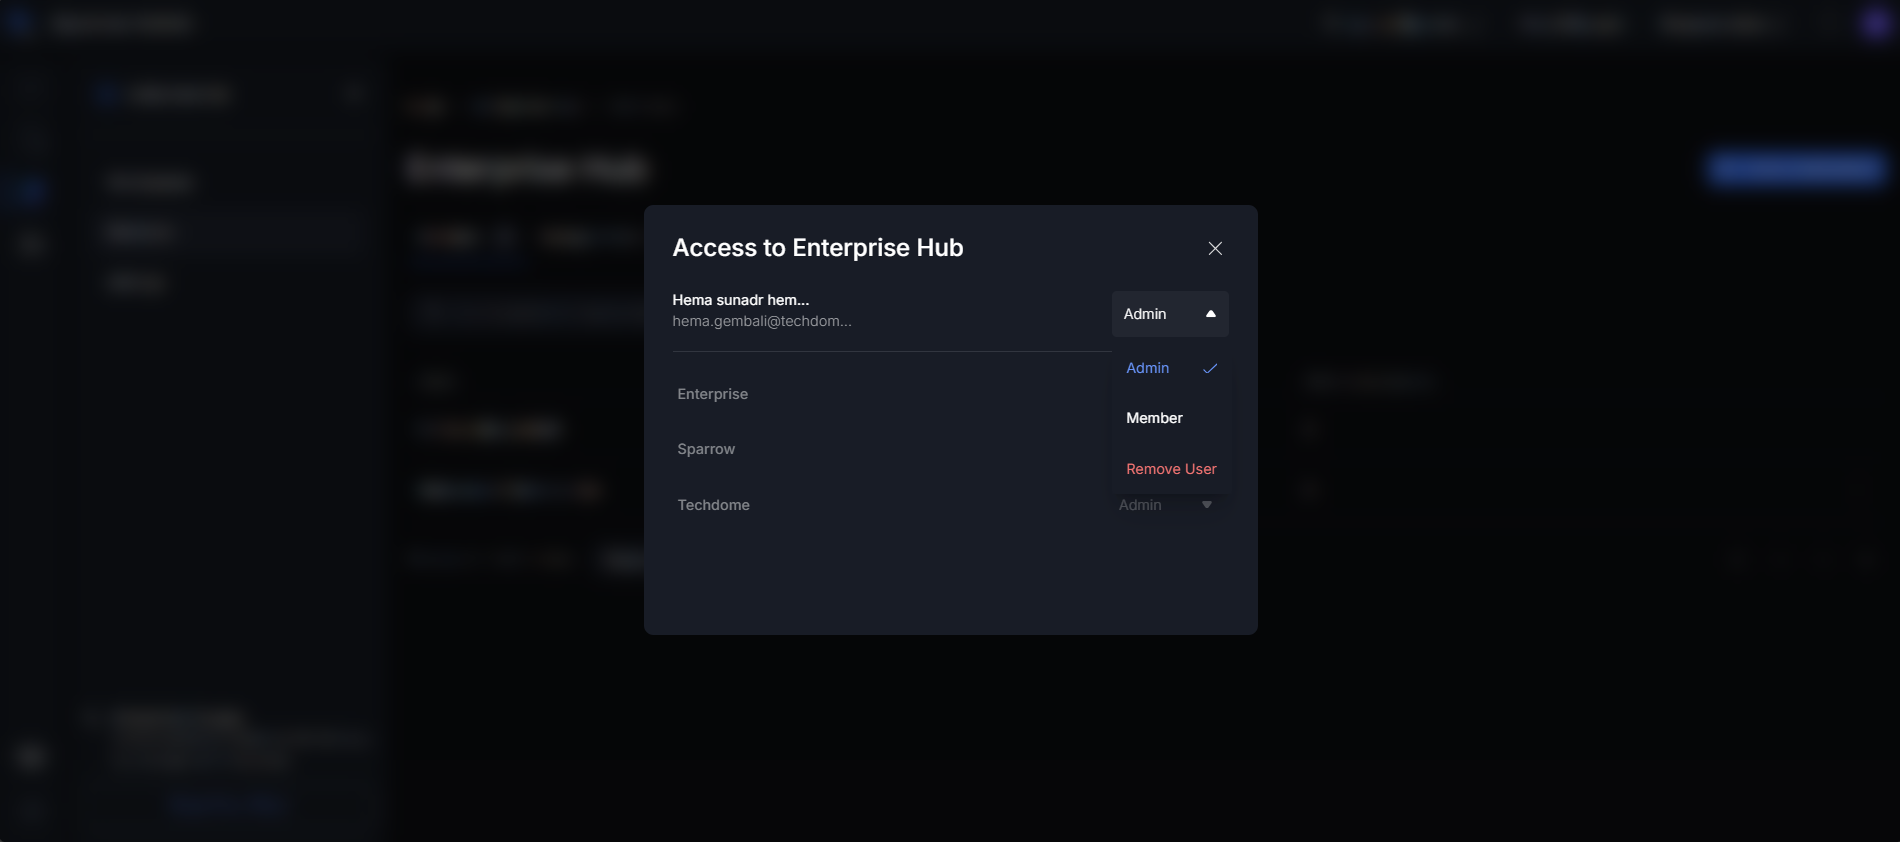
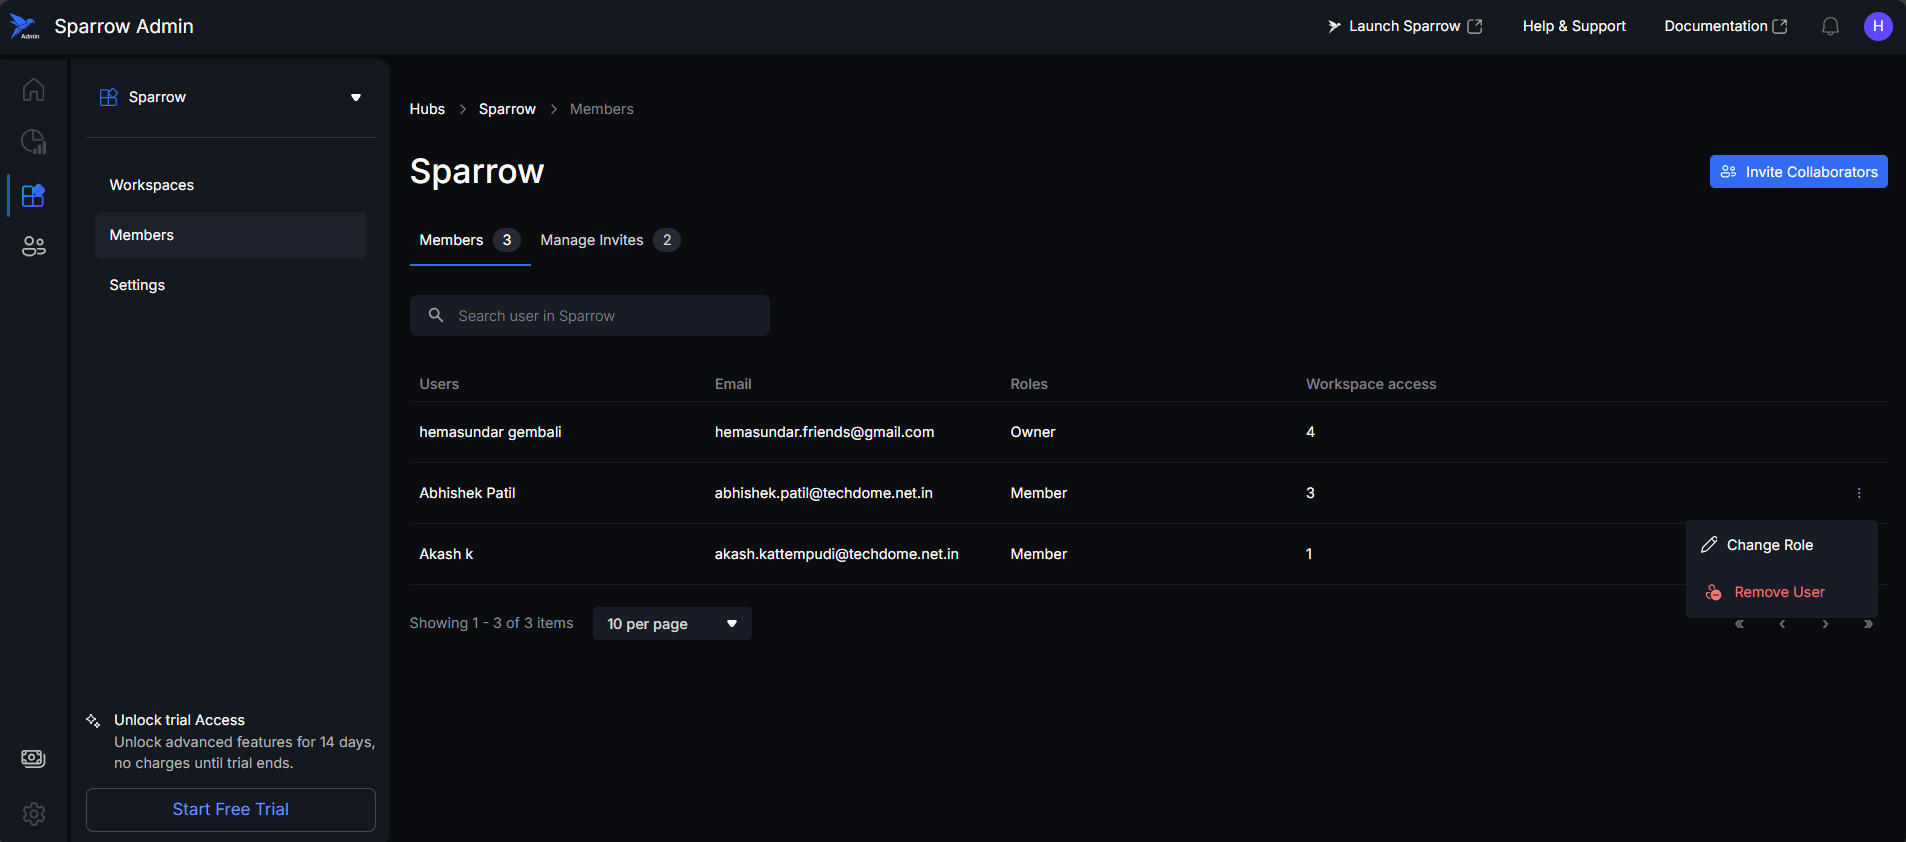
Step 1: Hover your cursor over the row of the member you want to manage in the member list. This will display a visual hover effect. Click the three dots menu (action button) at the end of the member's row. A dropdown menu will appear with two options: Change Role and Remove User. Click on Change Role.
Step 2: A pop up appeared with Click on Change Role. By clicking on the member, you can change the role as Admin/Member, or you Remove the user. Select the role.
Change Role Functionality
The ability to Change Role for individual members within a workspace provides several key administrative benefits:
-
Precise Access Control
-
Flexibility in Team Management
-
Streamlined Workflow
-
Roles:
- Admin A top-level role, typically used at the Hub level. Full Management Control.
- Member: A standard user role, often used at the Workspace level. Standard Access and Collaboration.
- Remove User: Revokes All Access. Choosing this option permanently removes the user from the Hub.
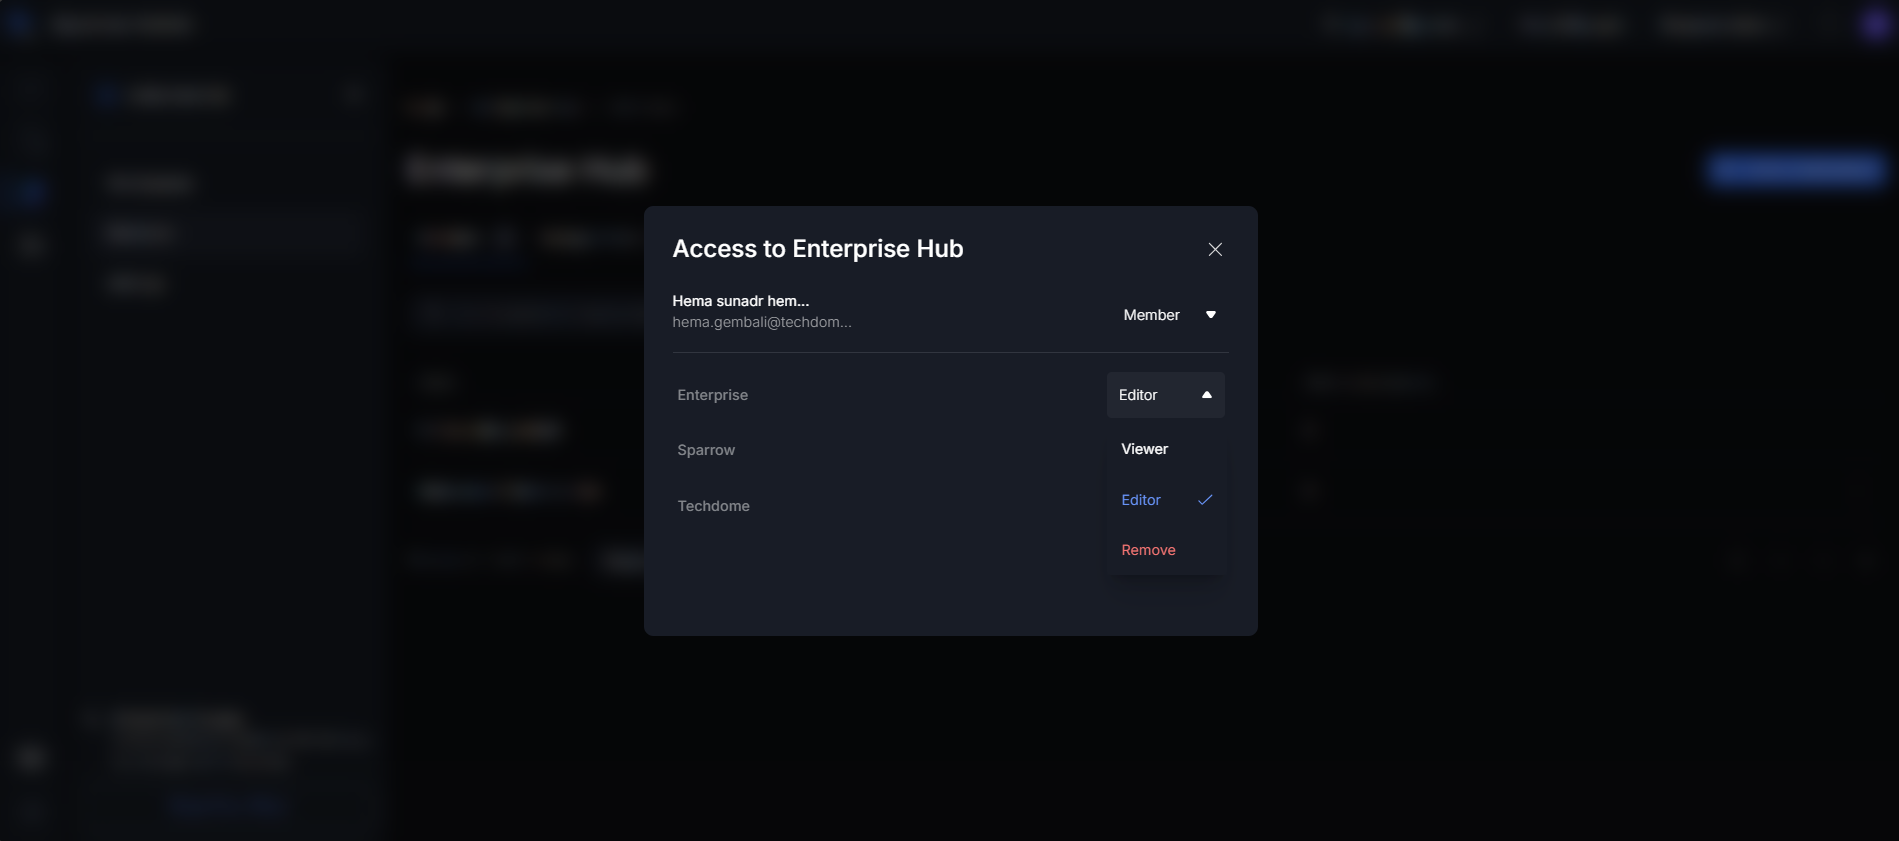
Step 3: User can change the access of workspace and remove the member from the workspace. Editor, Viewer and Remove are 3 available options.
- Editor: A role that grants the member full permission to modify resources within the workspace.
- Viewer: A role that grants the member read-only access to the workspace resources.
- Remove: An action that fully revokes the member's access to the workspace.
Step 4: When user click on Remove the member will be removed from the workspace / You can change the role. If you failed to do, try again by going through the steps once again.
Remove User
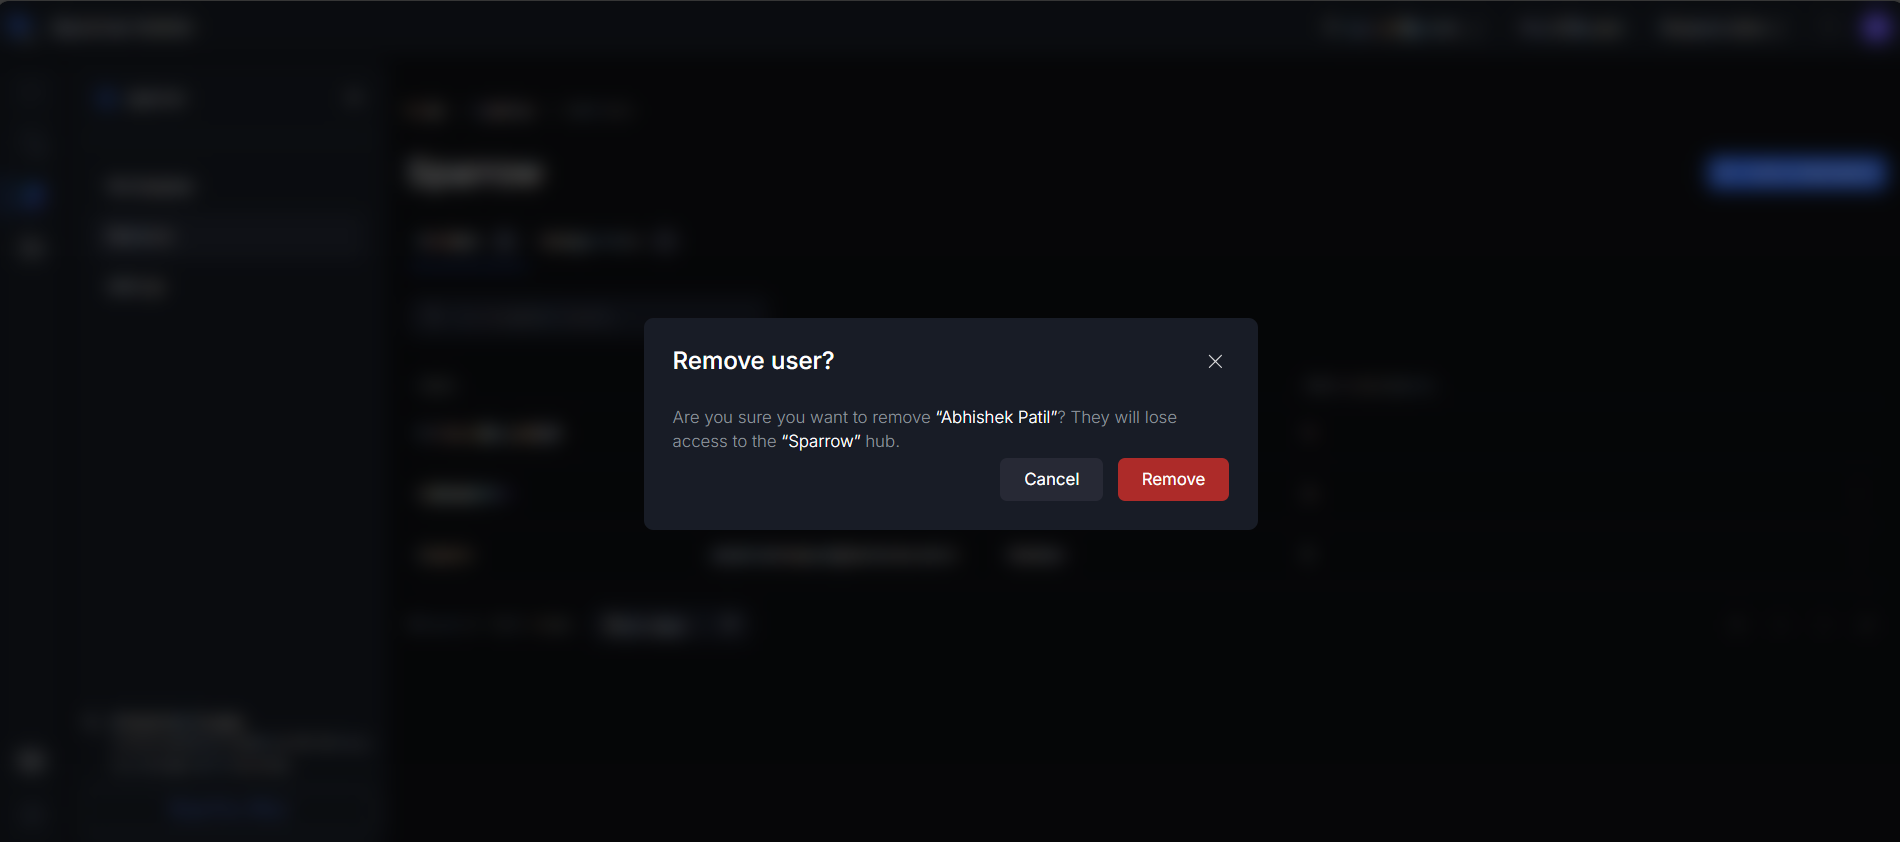
Step 1: To fully revoke a collaborator's access, click the Remove User option from the three dots menu in the member management list.
Step 2: When you select the Remove User option, a confirmation modal window will appear.
- To proceed with the removal, click the Remove button within the modal. This will permanently remove the user from the Hub.
- To stop the process, click Cancel. This closes the modal, and the user's access remains unchanged.
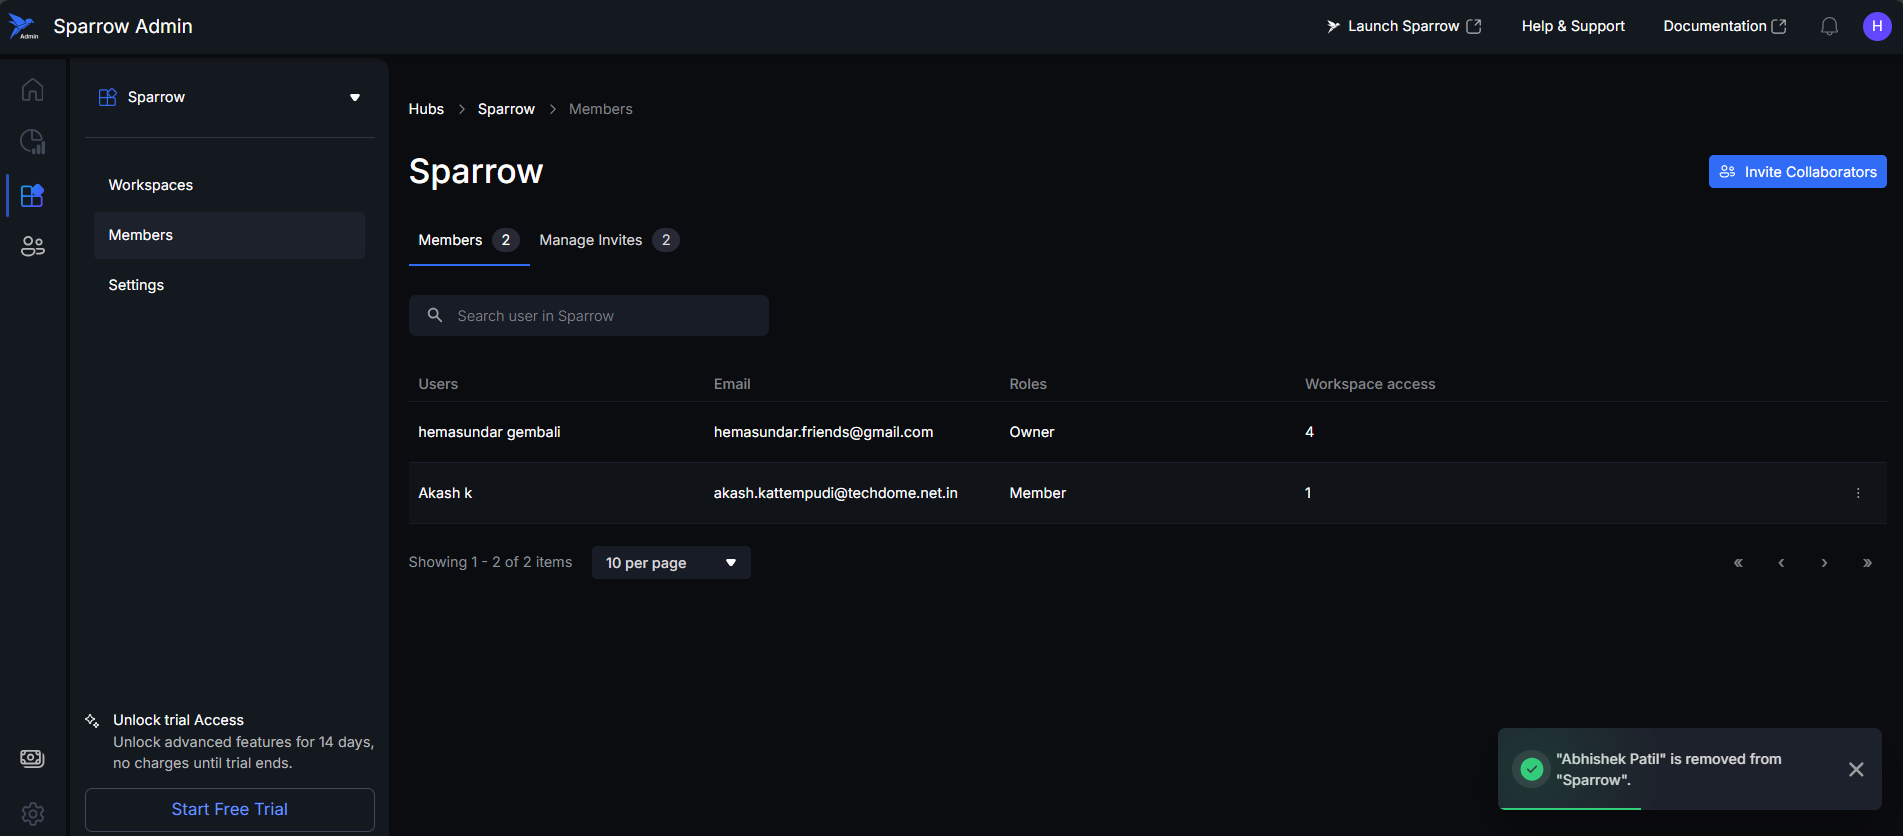
Step 3: After confirming the removal, the user will be successfully removed from the Hub. A confirmation Toast message stating that the user was removed successfully will then appear in the bottom right corner of the window.
In case of Failure, you can see Error notification. Try again to remove the User.
E.g.: “Alex Parker” is removed from “Enterprise Hub”
Managing Invitations
The Manage Invites section within the member management area gives the administrator full control over all outgoing collaborator invitations.
-
The available functionalities include:
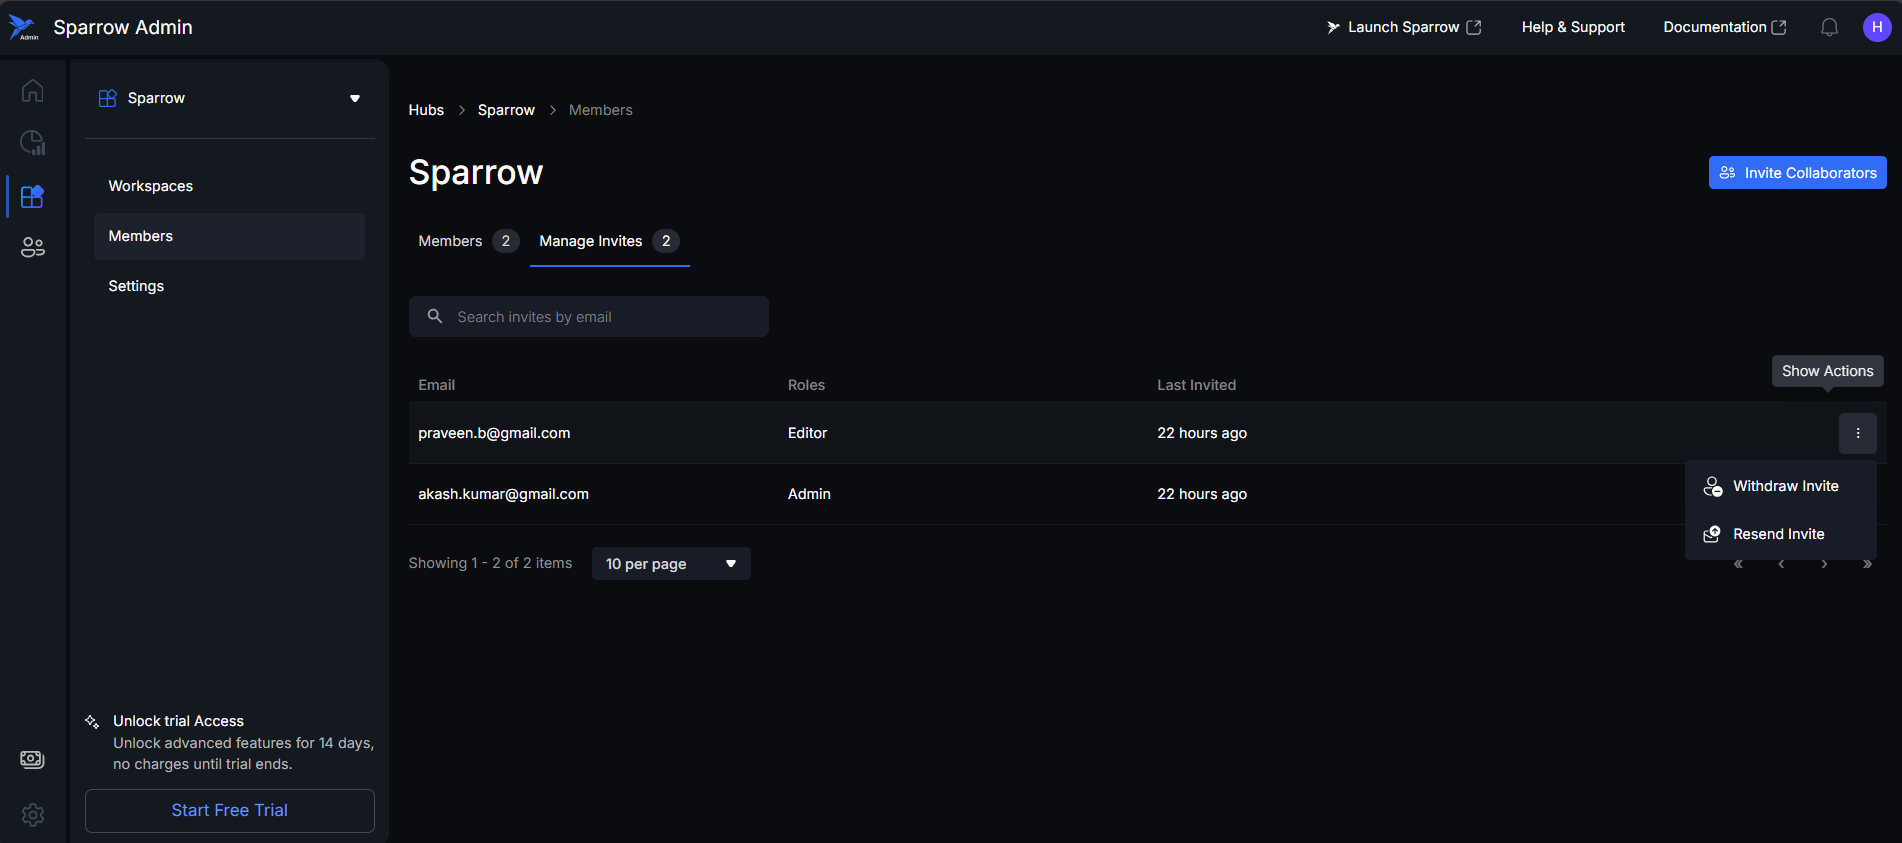
- View Invites: You can view a comprehensive list of all collaborators to whom an invitation has been sent.
- Withdraw Invite: You have the ability to cancel and withdraw a pending invitation.
- Resend Invite: You can resend the invitation to the member if the original invite was missed or expired.
-
Benefits:
- Improved Control and Security: The ability to view and withdraw invitations ensures administrators maintain control over who has pending access to the Hub or Workspace, enhancing security.
- Enhanced Onboarding Reliability: Being able to resend the invite ensures that key collaborators who missed the original email or link can easily regain access, leading to a smoother and faster onboarding process.
- Clear Audit Trail: The ability to view all sent invitations provides a clear record of who was invited and when, serving as a simplified audit trail.
Step 1: Hover over the user and click on 3 dots menu to edit the invite.
Step 2:
-
Case 1: Withdraw Invite
- Click on Withdraw Invite to cancel and withdraw a pending invitation. You can see Invite withdrawn successfully toast message at bottom.
- If failed to Withdraw, try again by going through all the steps.

-
Case 2: Resend Invite
- Click on Resend Invite. You can resend the invitation to the member if the original invite was missed. Toast message shown at the bottom.
- If you failed to resend, try again the steps to successfully resend the Invite.