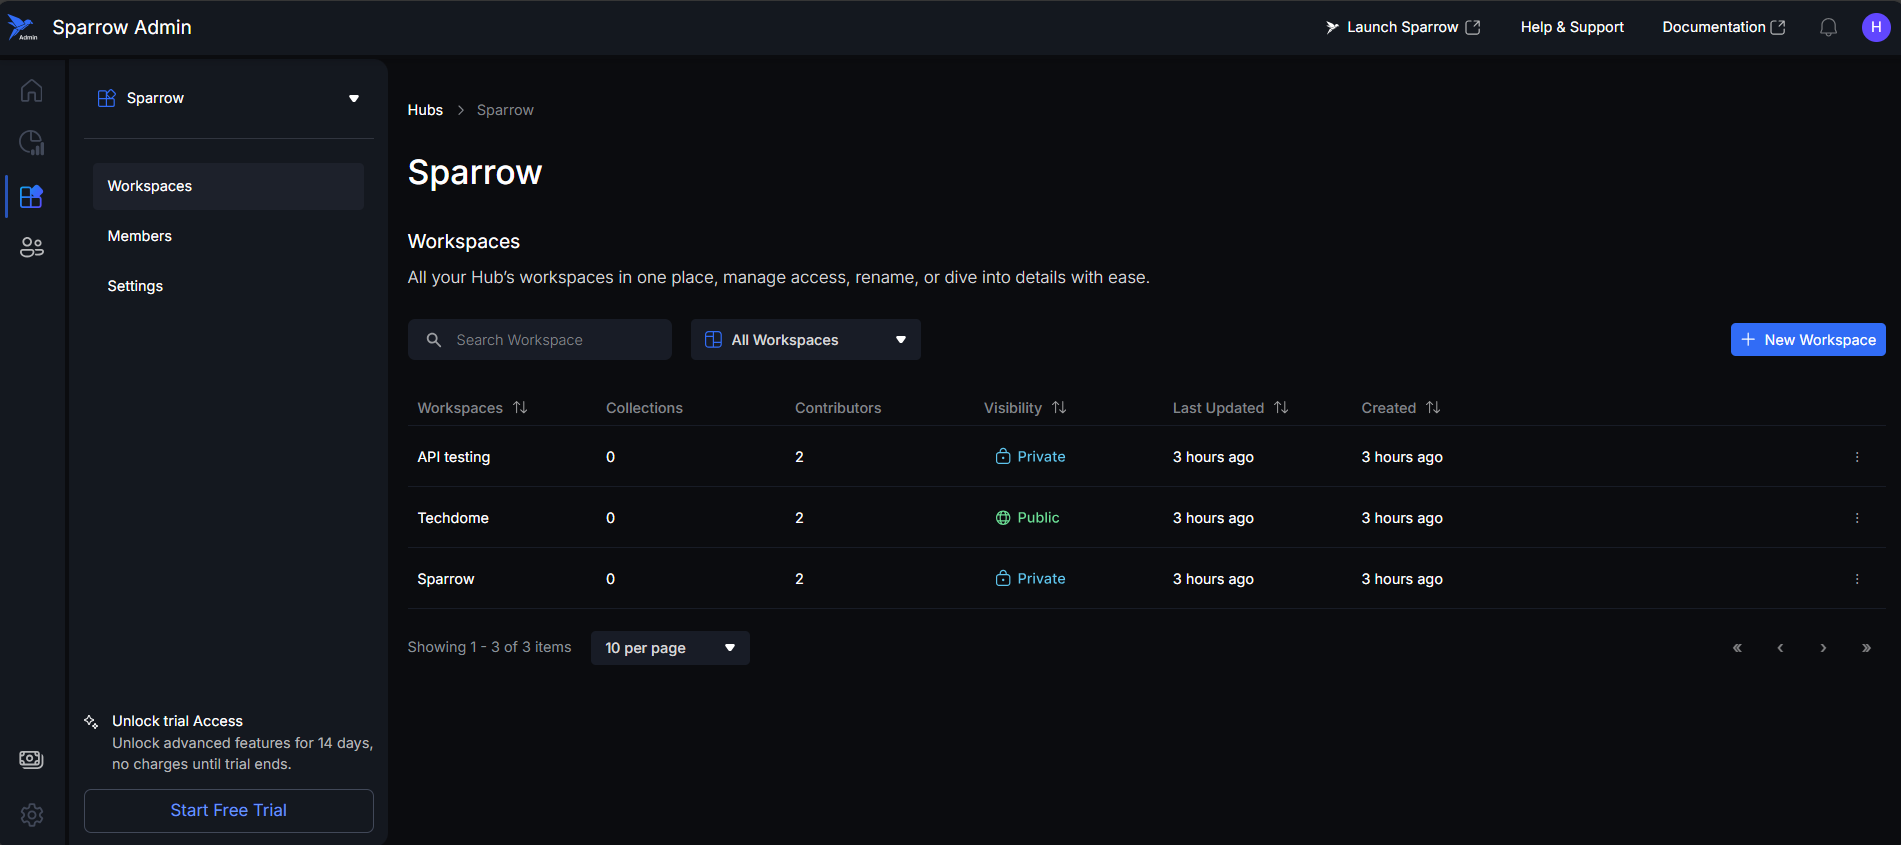
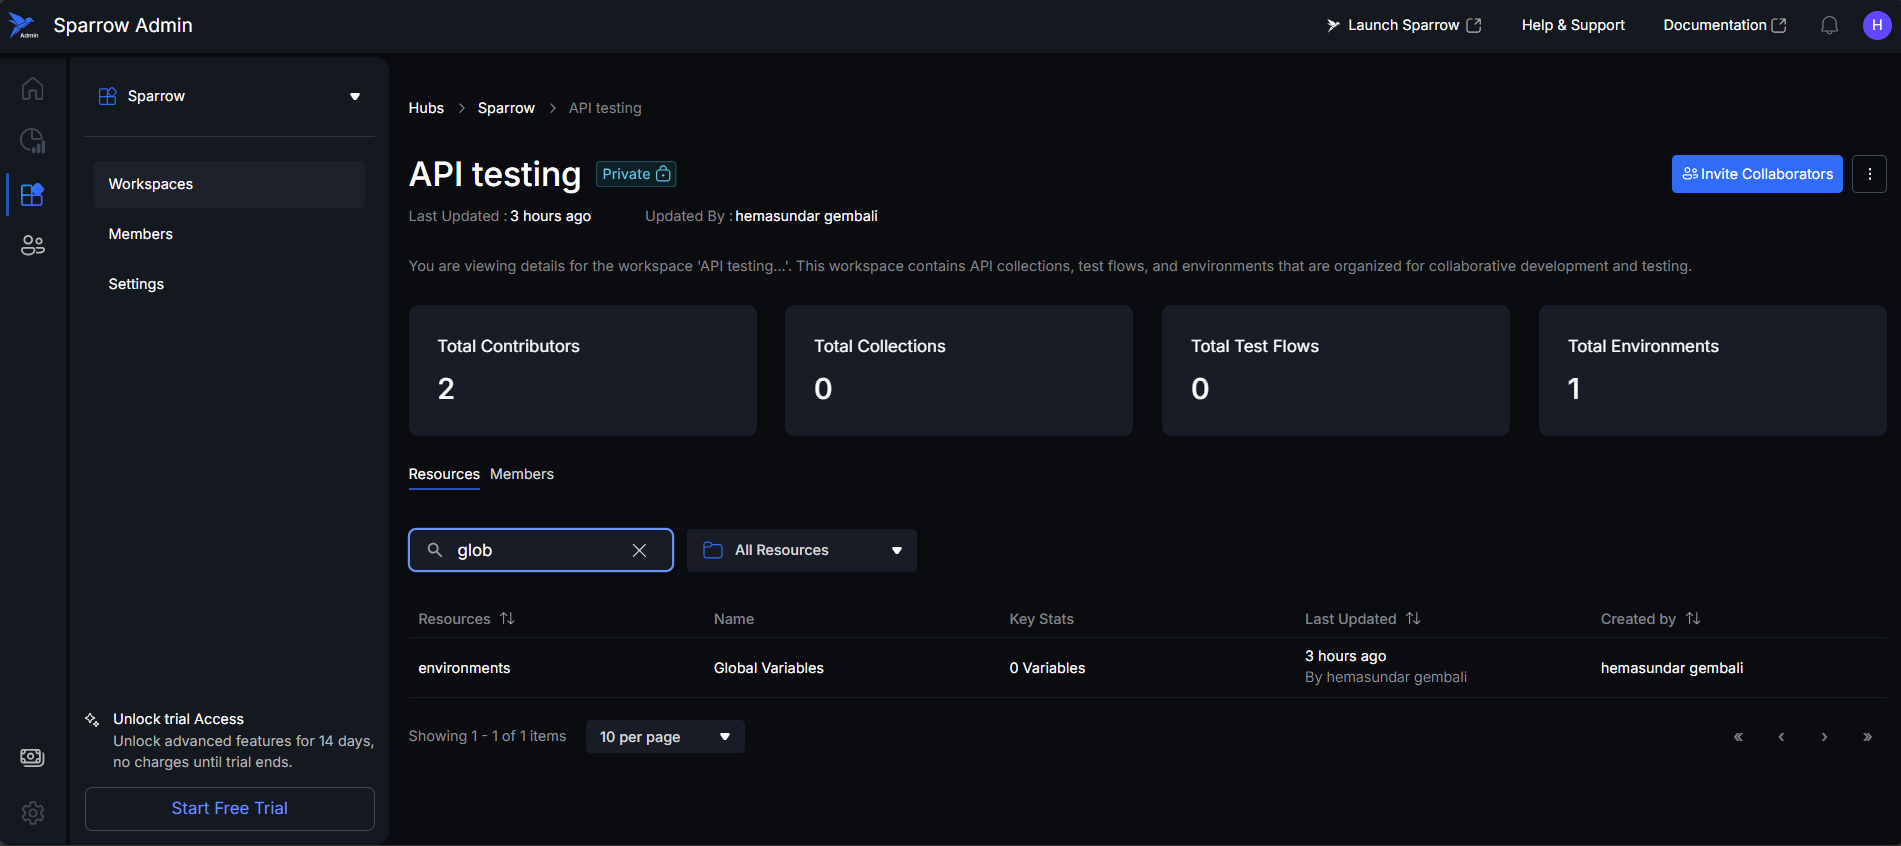
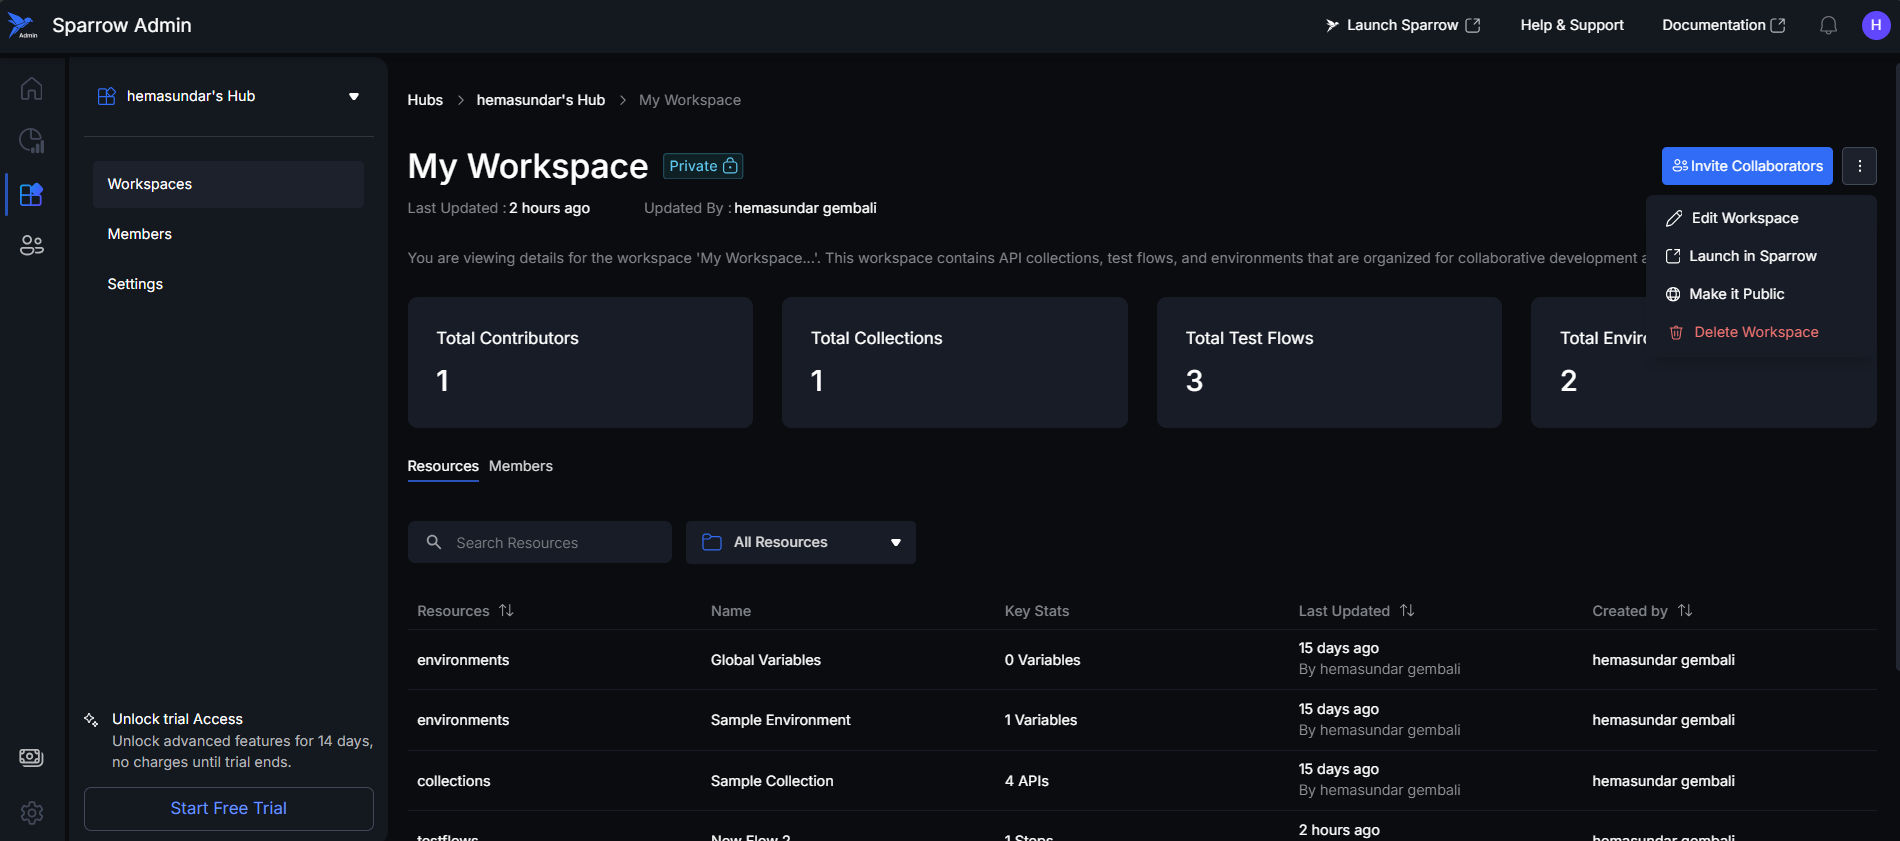
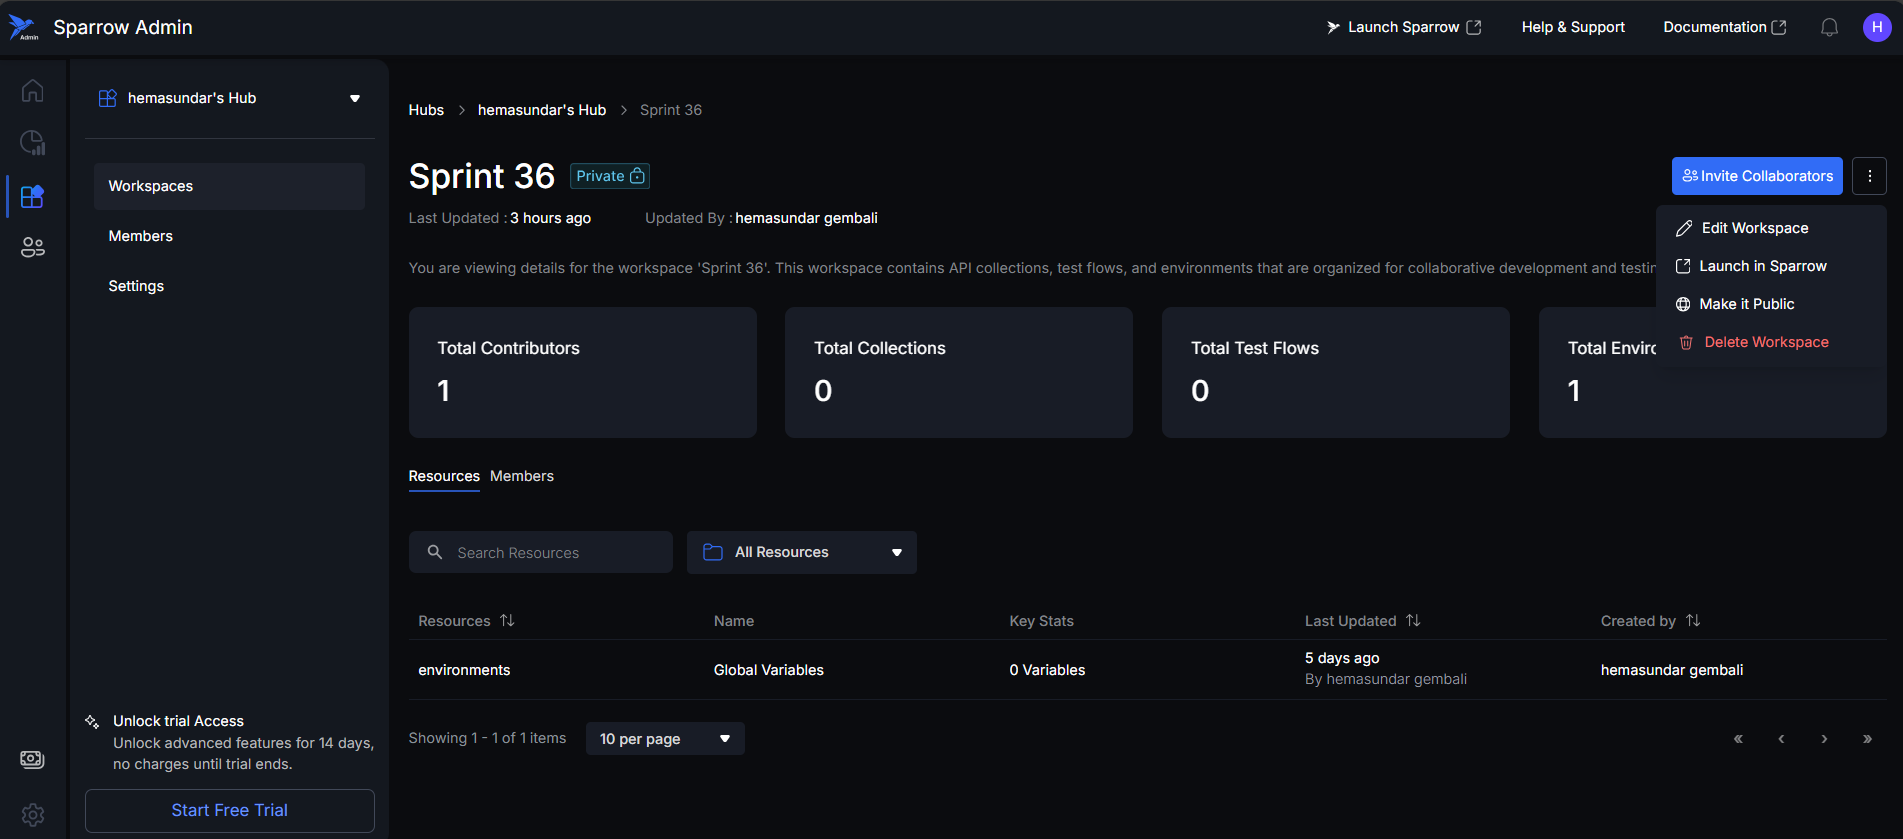
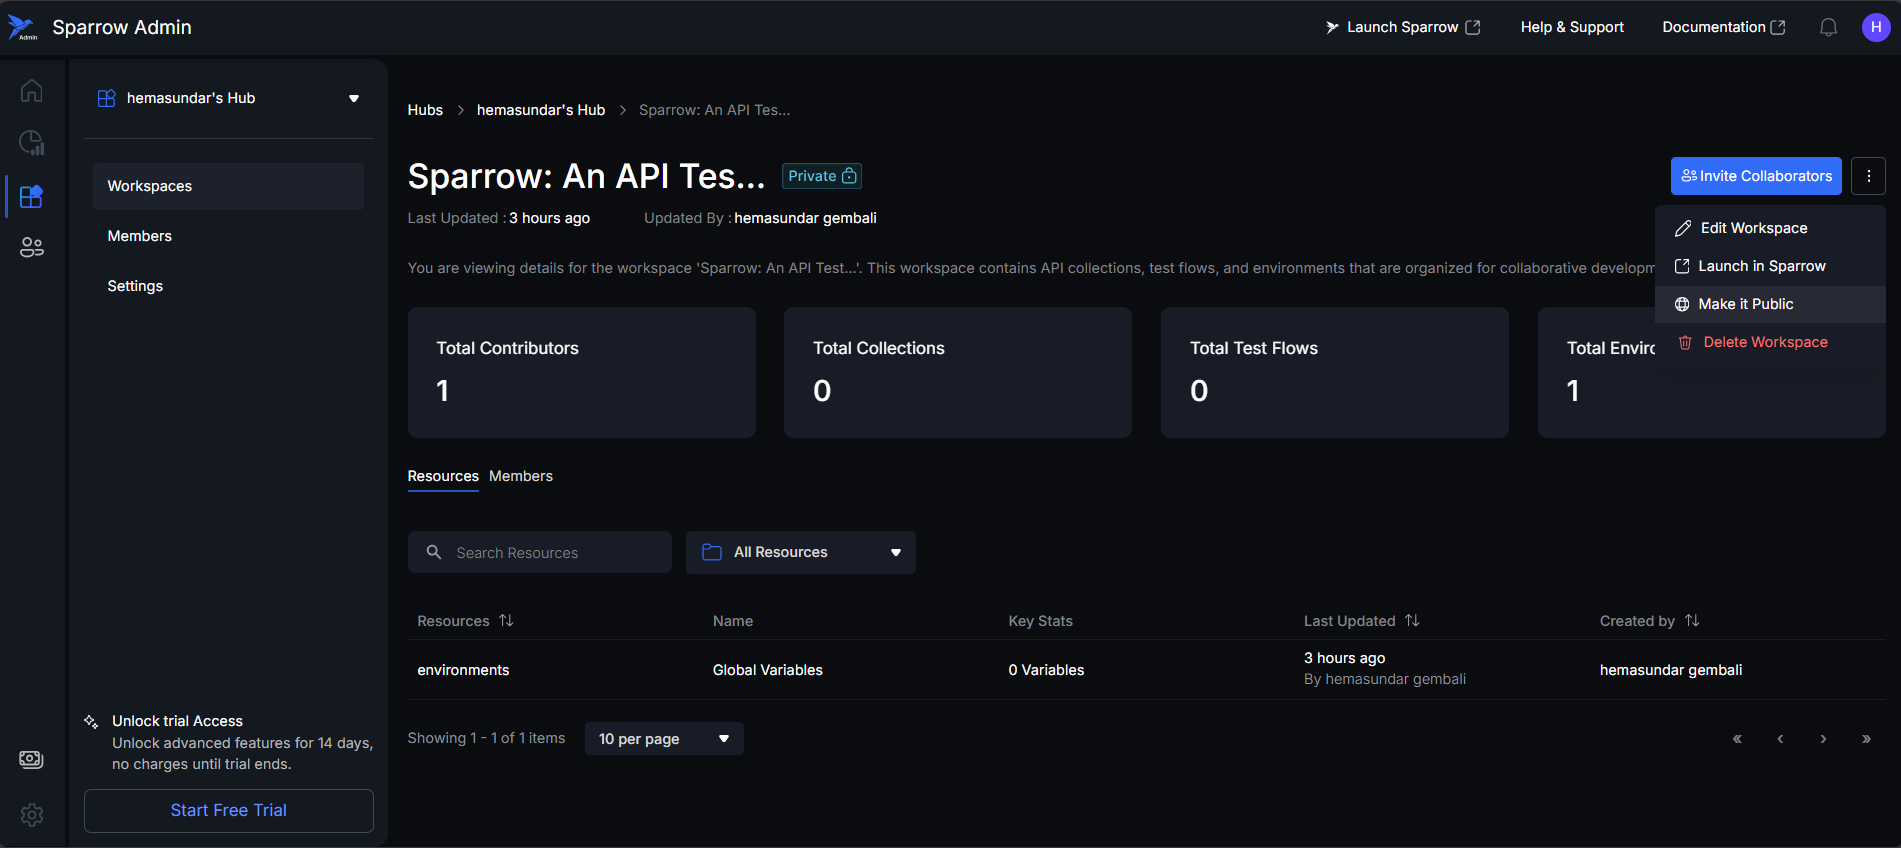
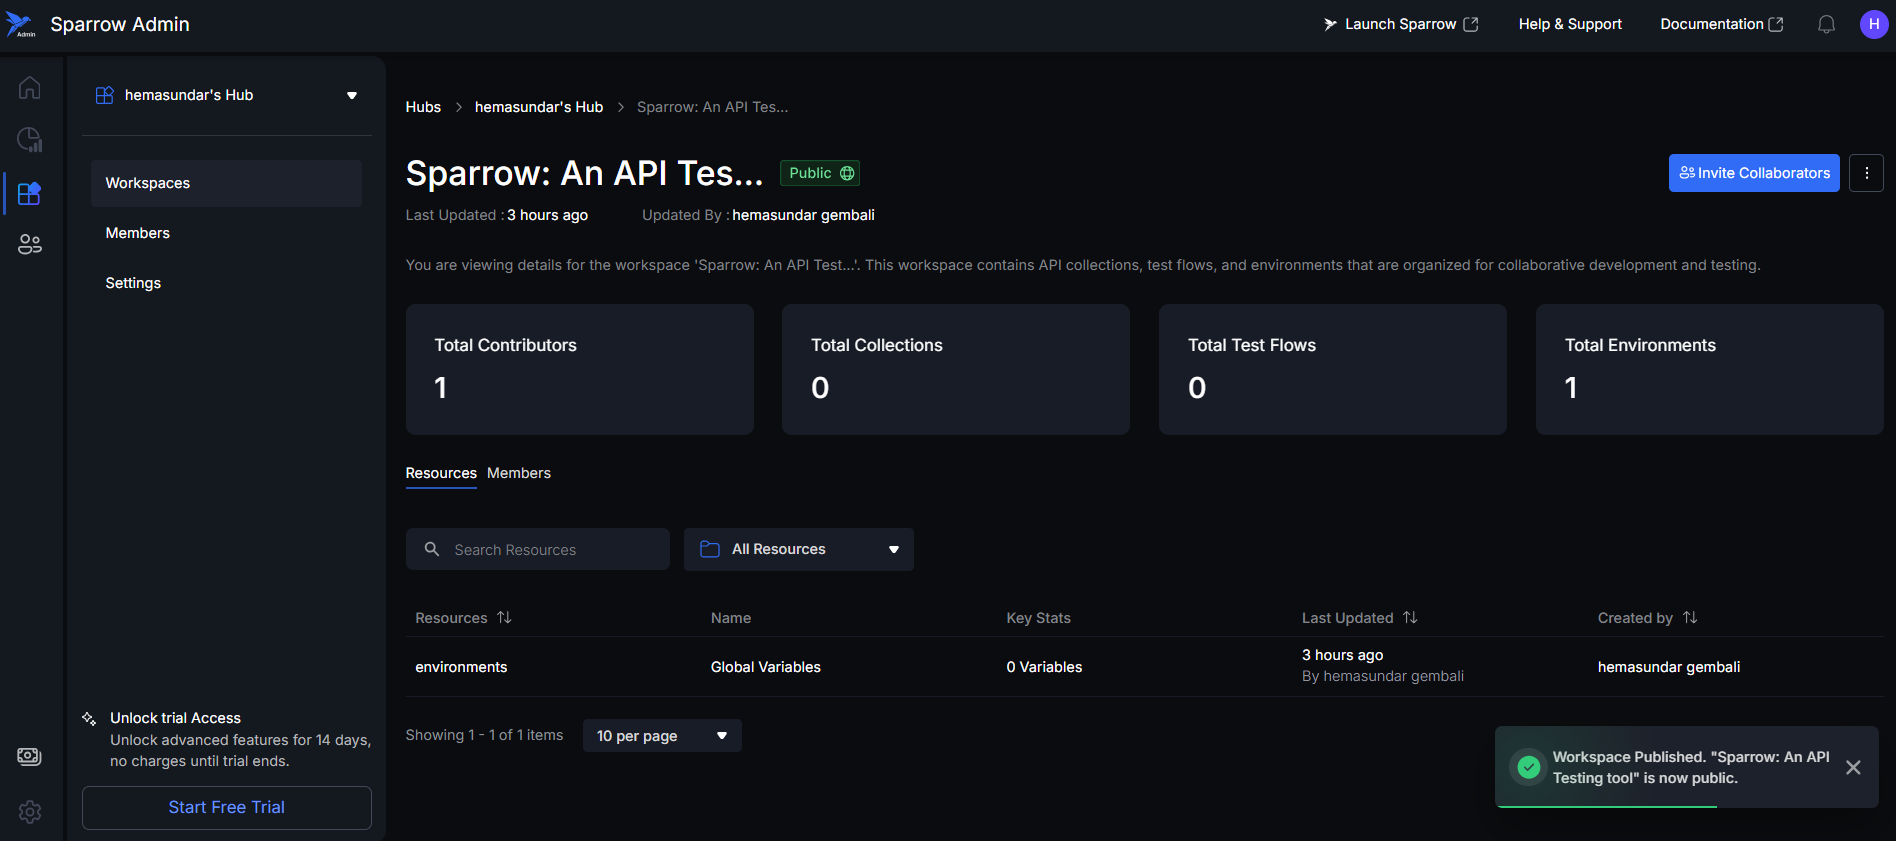
Workspace
The Workspace Detail Page serves as the primary administrative dashboard for managing all aspects of a single, specific workspace within a Hub. It consolidates key metrics, resource listings, and member management tools into one view.
Overview
The page is structured to provide an immediate summary followed by detailed management tabs:
- Header: Displays the Workspace name, visibility (Private/Public), and last updated tracking.
- Key Metrics: Provides real-time statistics on Total Contributors, Collections, Test Flows, and Environments, offering a quick gauge of the workspace's scale and activity.
- Tabs: Contains Resources (listing all APIs, flows, and environments) and Members (managing access and roles).
Benefits
- Centralized Management: Manage technical resources and collaborators from a single interface, eliminating screen switching for administrative tasks.
- Quick Monitoring: Gain immediate insight into usage and composition via Key Metrics (e.g., fast assessment of resource limits and team size).
- Resource Auditing: Support version control and accountability with critical tracking information (Last Updated, Created By) displayed for every asset.
- Efficient Collaboration: Instantly and precisely manage team access and foster collaboration via the Members Tab and Invite Collaborators button.
Search bar
You can search for any Collection/Test flows/Environment using the name and filter it in the list.
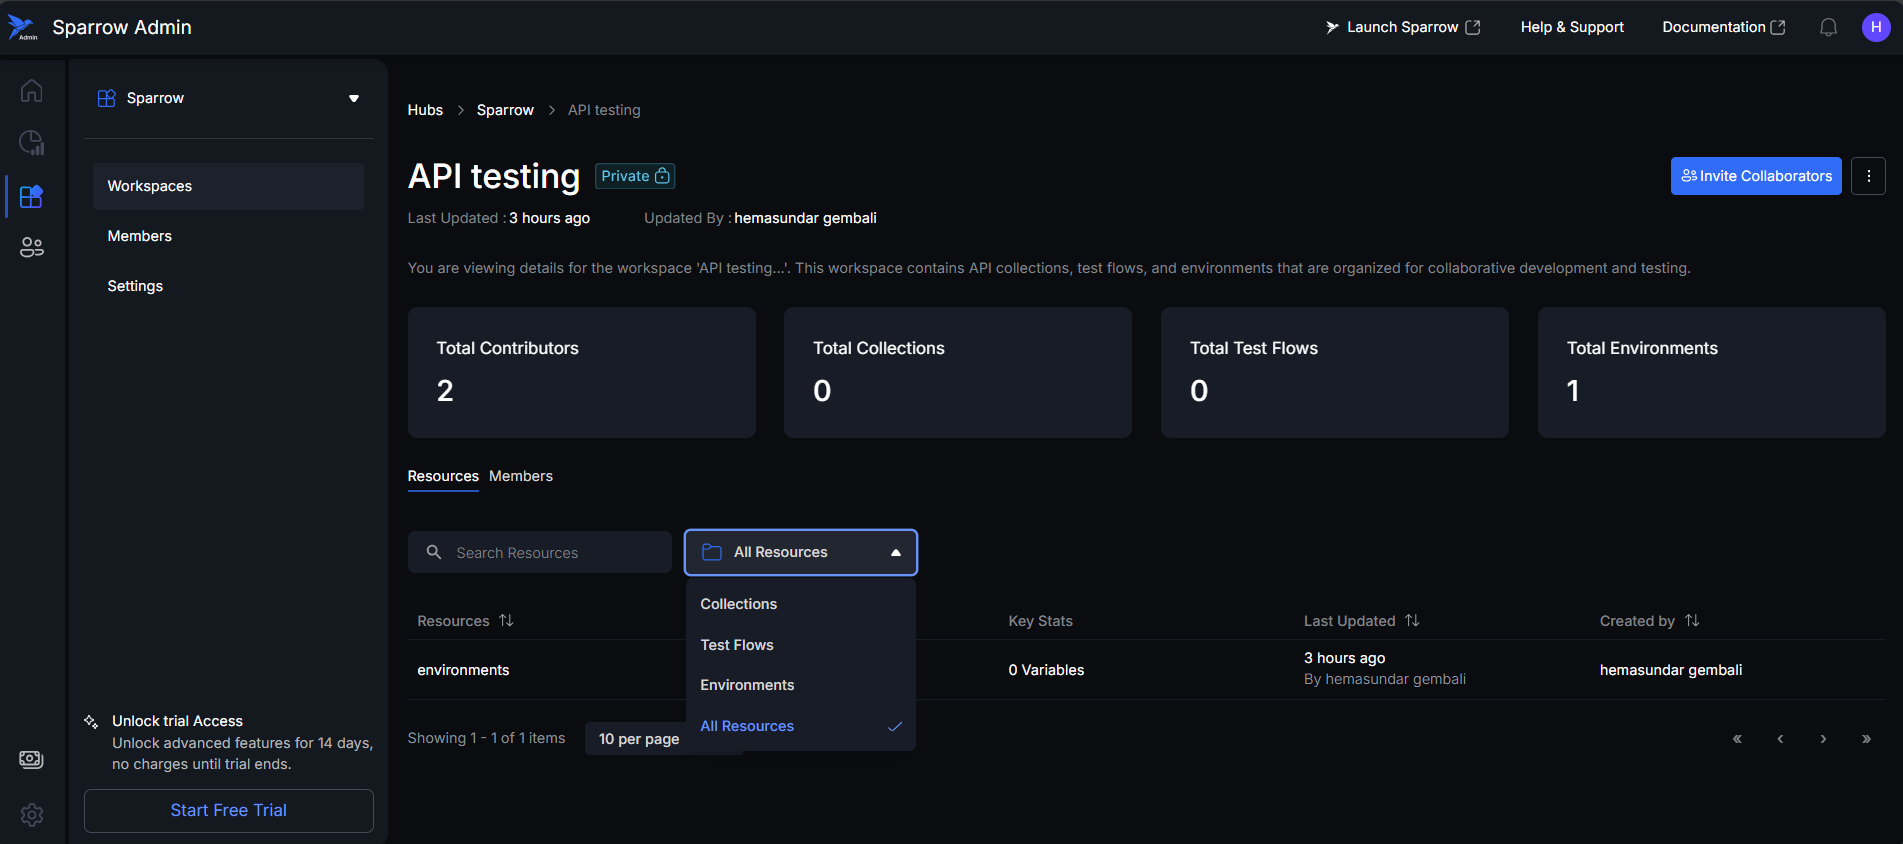
Resource Dropdown
Clicking on the Dropdown of All Resources (Default), you can see Collections, Test flows, and Environments. You can select anything to filter and view it in the page.
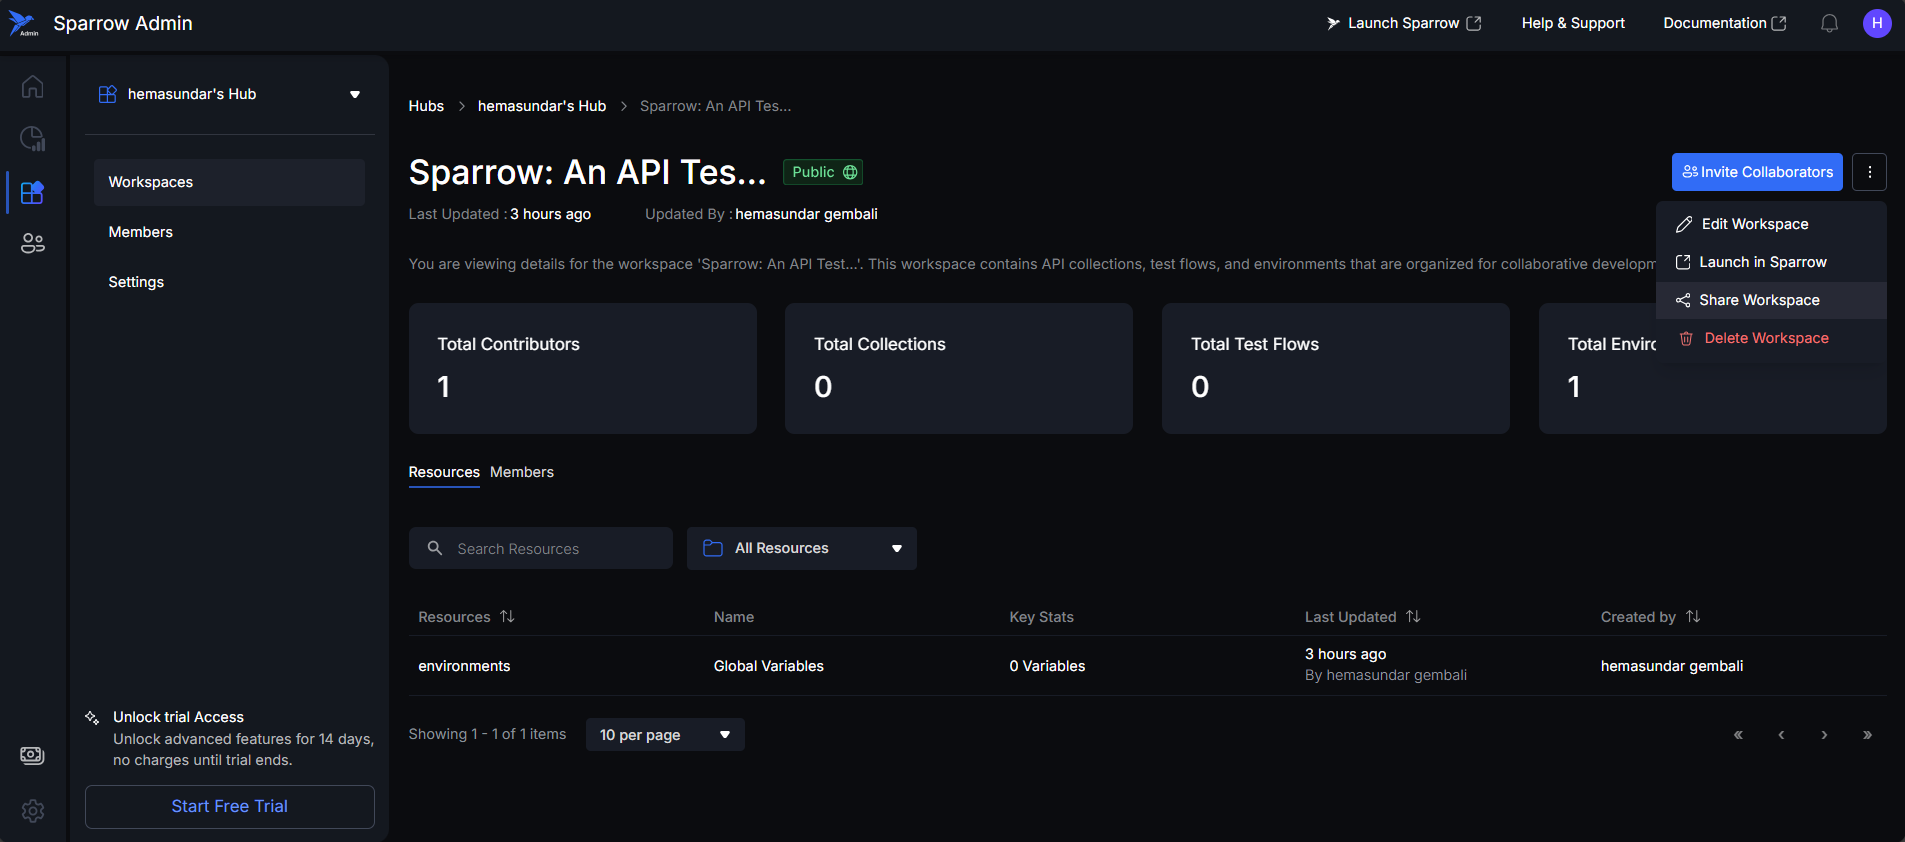
Workspace management
Action Menu (Three Dots): Clicking the three dots reveals management options for the workspace itself:
- Edit Workspace: Opens settings to modify basic details (name, summary, etc.).
- Launch in Sparrow: Redirects the user to the live Workspace environment in the Sparrow web application.
- Make it Public: Changes the workspace visibility from Private to Public.
- Delete Workspace: Permanently removes the workspace.
Edit Workspace
Steps to Edit a Workspace:
Step 1: To change a workspace's basic information, click the Action Menu (three dots), and select Edit Workspace.
A pop-up modal will immediately appear, allowing you to easily update the Workspace name and Workspace Summary.
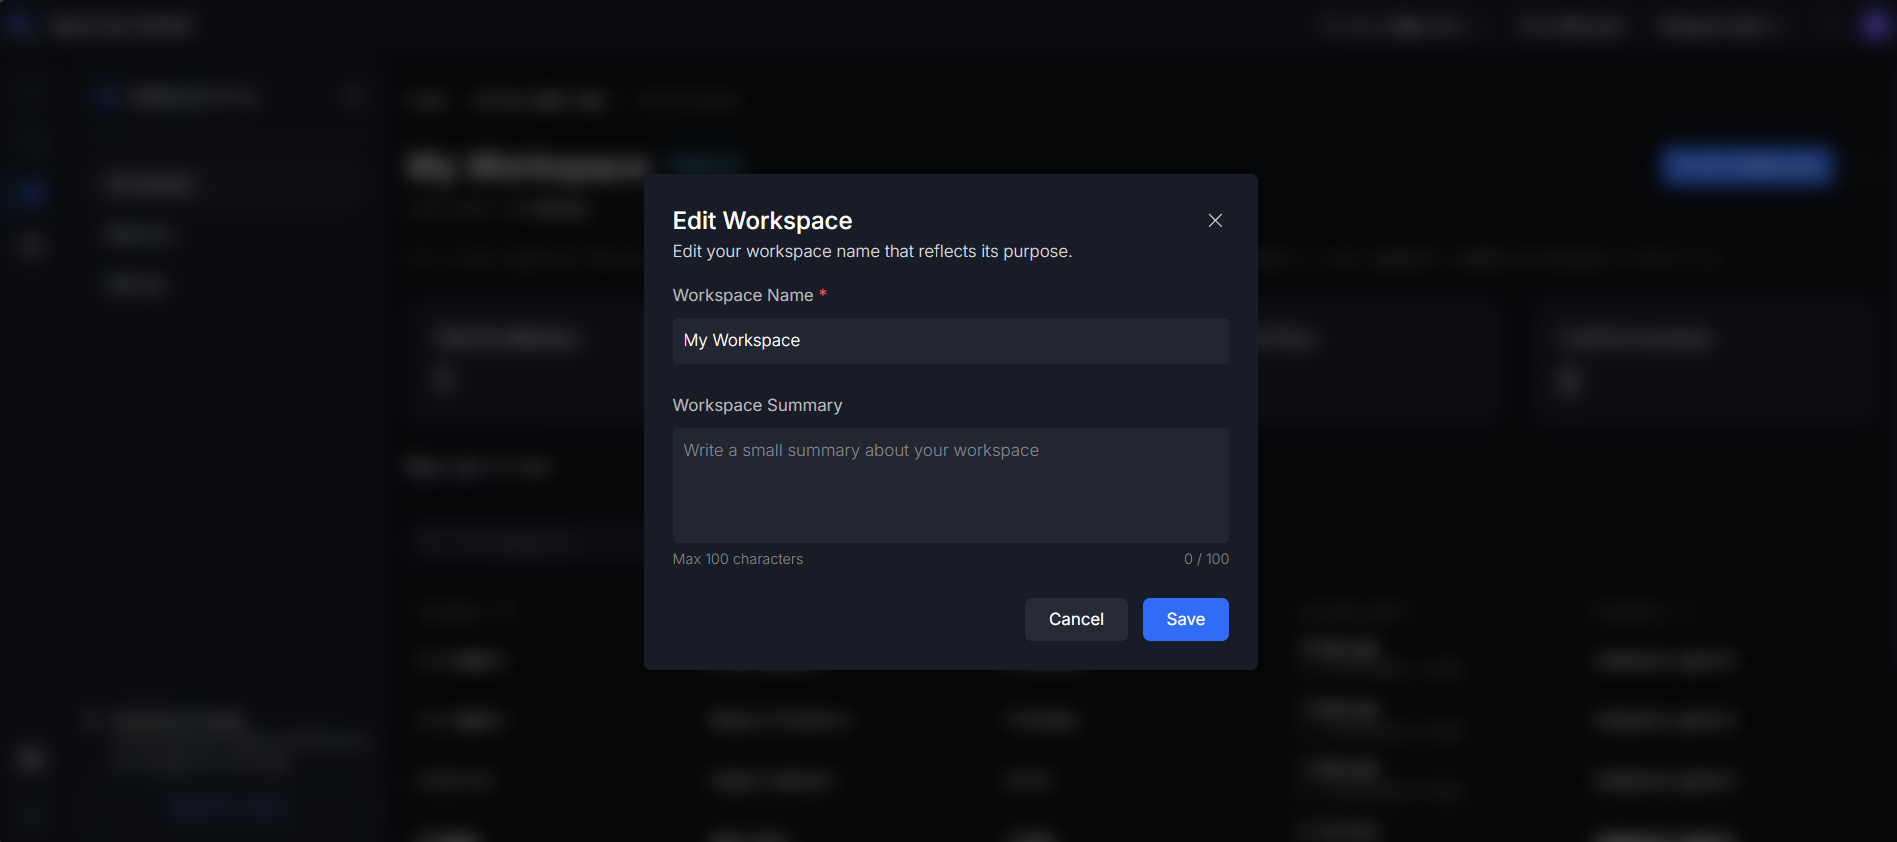
Step 2: Click on the Name bar and you can edit the name. The Workspace Name is a mandatory field. You cannot save the workspace if this field is left empty. If you attempt to save without entering a name, an error message will be displayed. Since the Workspace Summary is optional, you can save your workspace edits even if that field is left blank.
- Caution:
- If you leave the name empty and try to save, the system will prevent the save action and display an error message.
- You cannot save the Workspace name with an existing name which is on your Hub. It must be an unique name.
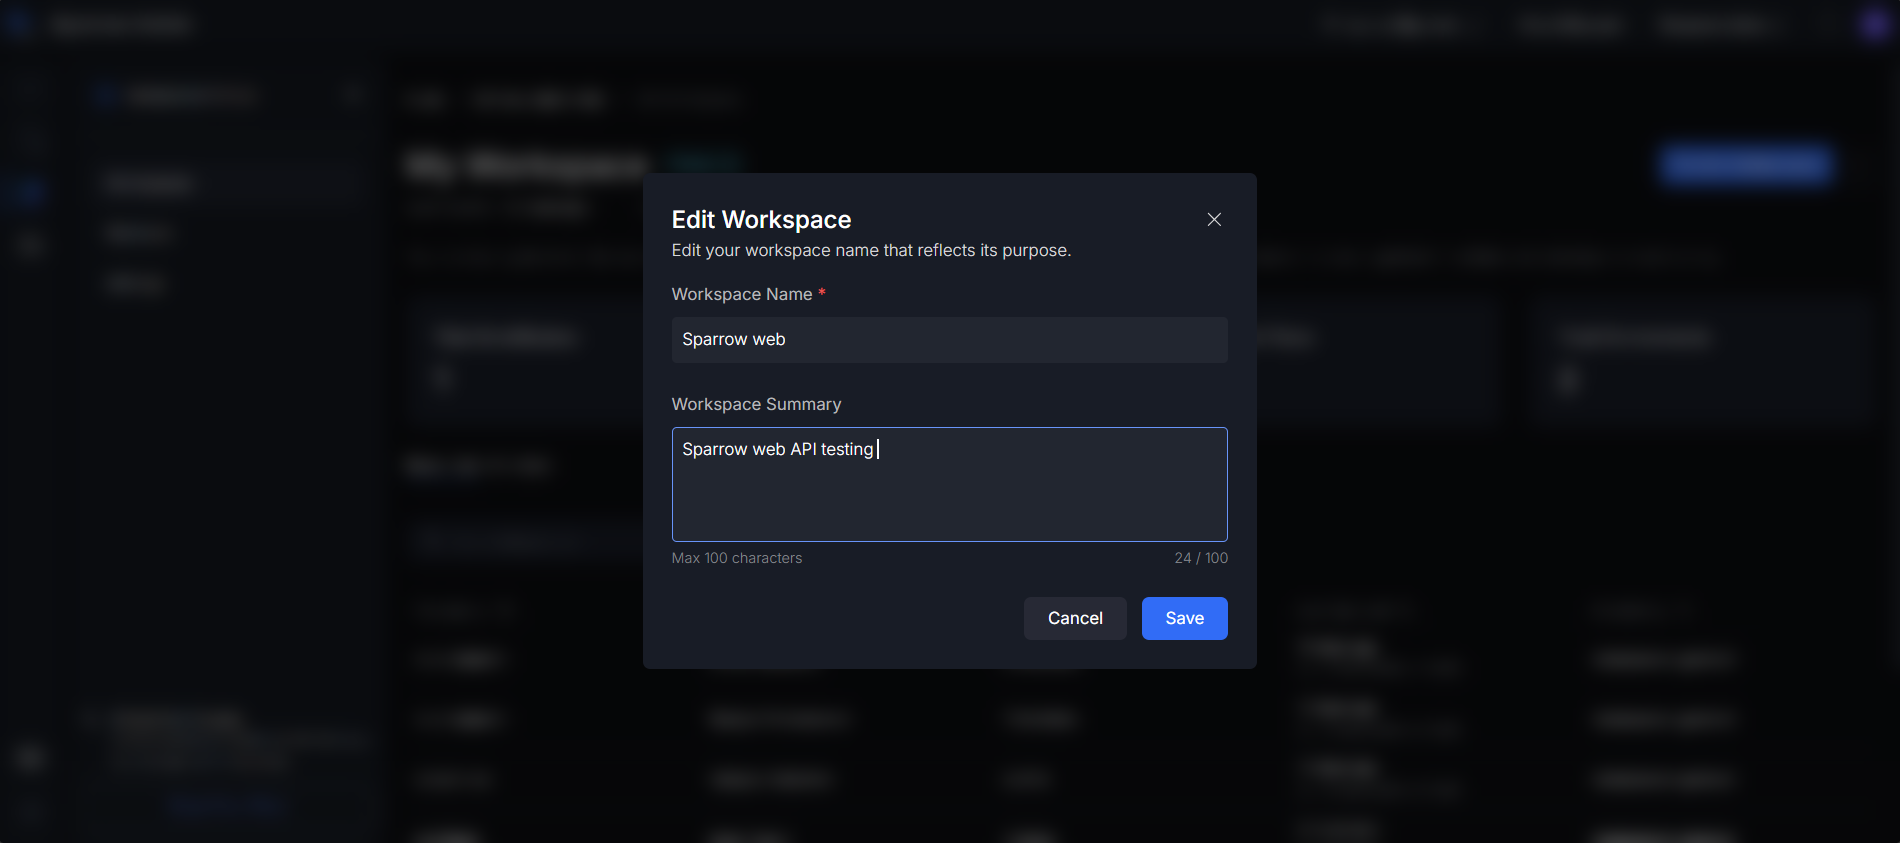
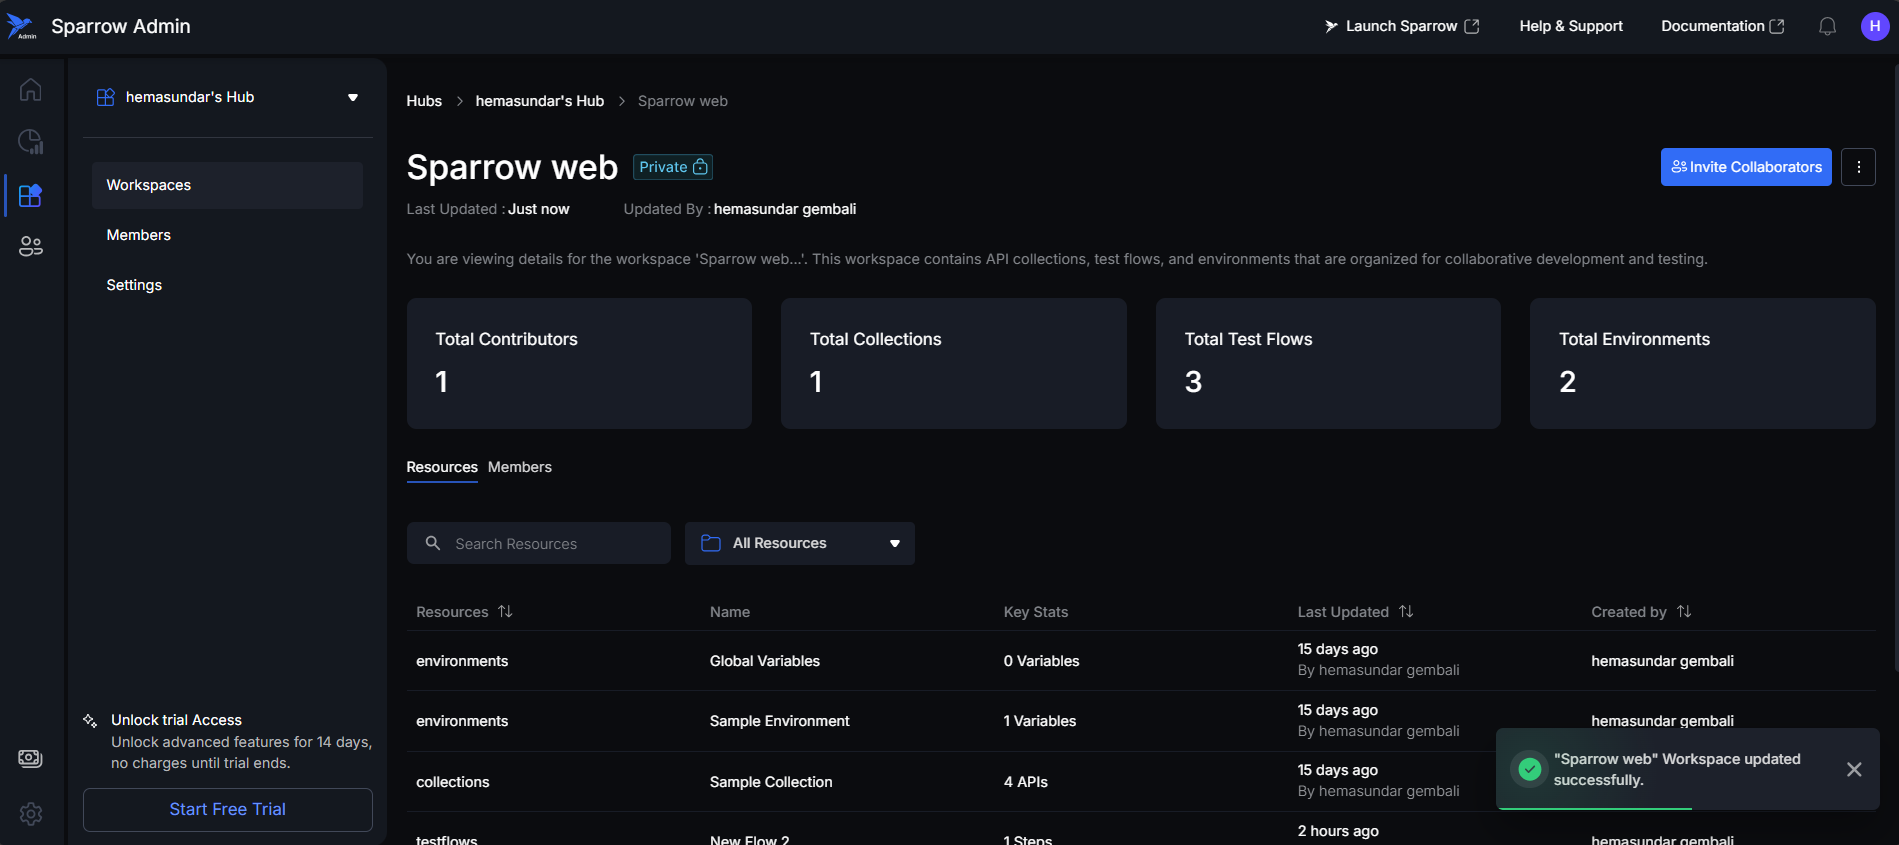
Step 3: Click on save, to save the edit for the Workspace. If it got saved, you can see Toast message saying that “Workspace saved successfully”.
If the update process is unsuccessful, you will receive the error message: "Failed to update workspace. Please try again.". Simply repeat the steps for editing and saving the workspace details.
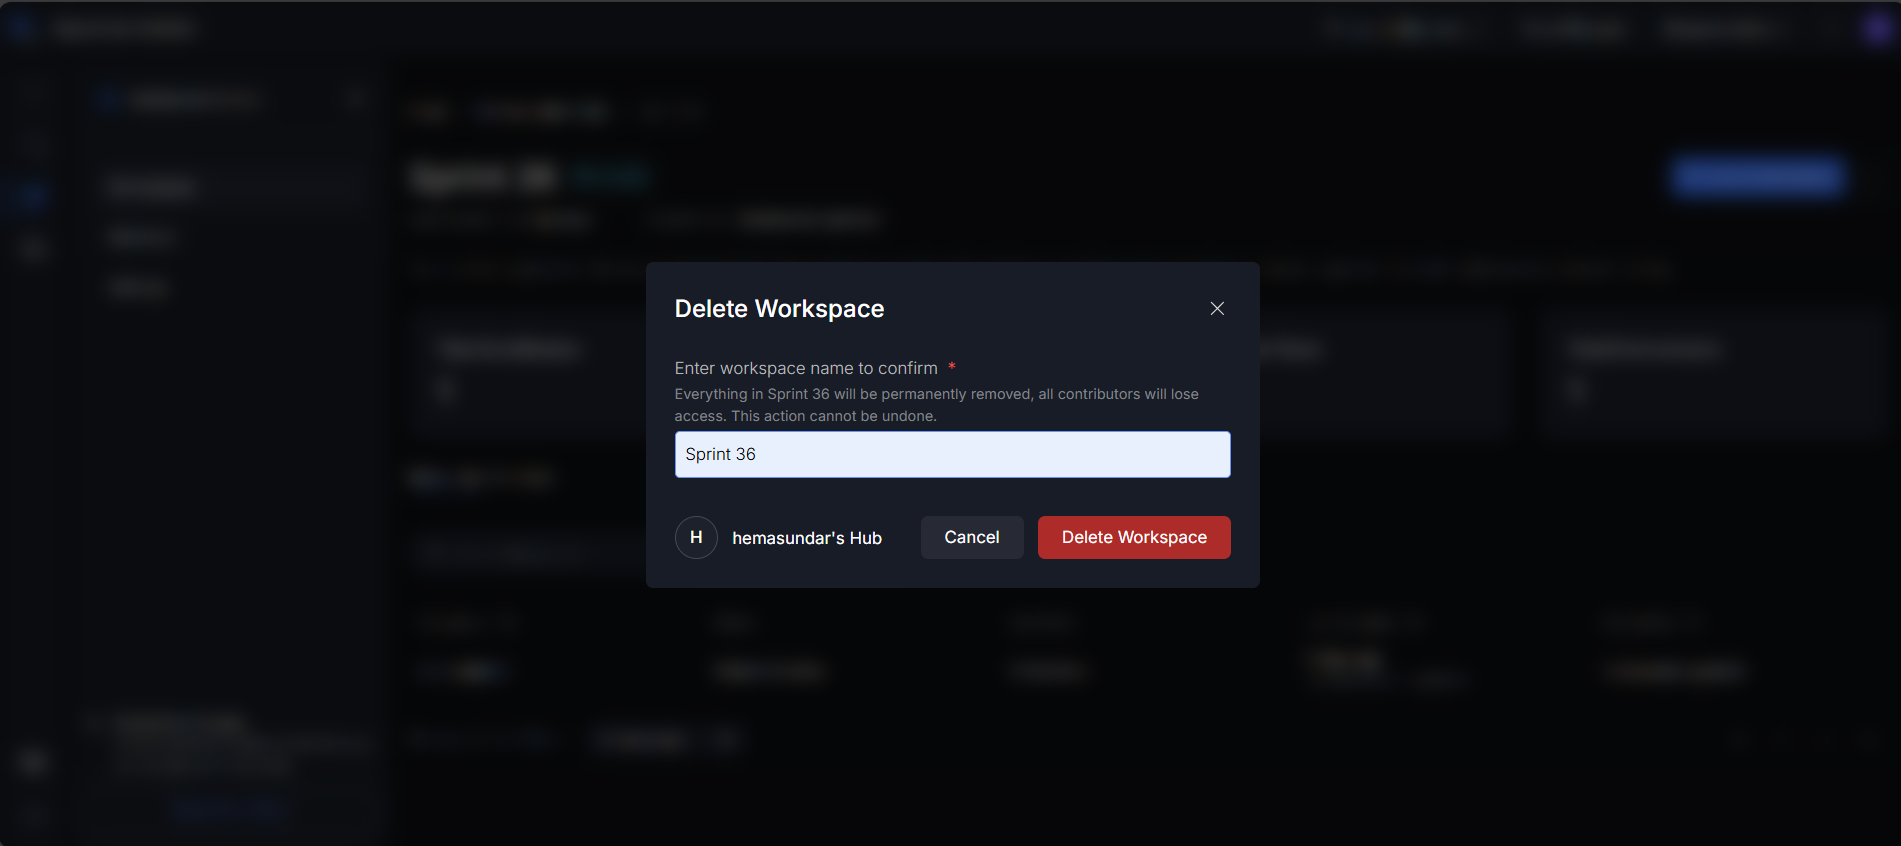
Delete Workspace
Steps to delete a workspace
Step 1: Click on Delete workspace option from the Action menu (3 dots).
Step 2: A modal appears asking for confirmation of deletion of the workspace. You must type the Workspace name, to confirm.
E.g.: Sprint 36
All contributors will lose access and everything in Workspace is deleted permanently.
Step 3: Click on Delete Workspace. Then you can see that the Workspace is deleted successfully. You can see the Toast message.
If it is not deleted, you can see a error message. Try again for Successful deletion.

Publish Workspace
A Public workspace maximizes transparency and external sharing, making your API resources discoverable by a wider audience, including partners and the general community.
- Benefits:
- Wider Adoption: Your APIs and documentation become publicly discoverable and viewable by anyone.
- Faster Onboarding: External partners and new developers can immediately view and use your resources without needing individual invites.
- Transparency: It establishes a single source of truth for your APIs that is accessible globally.
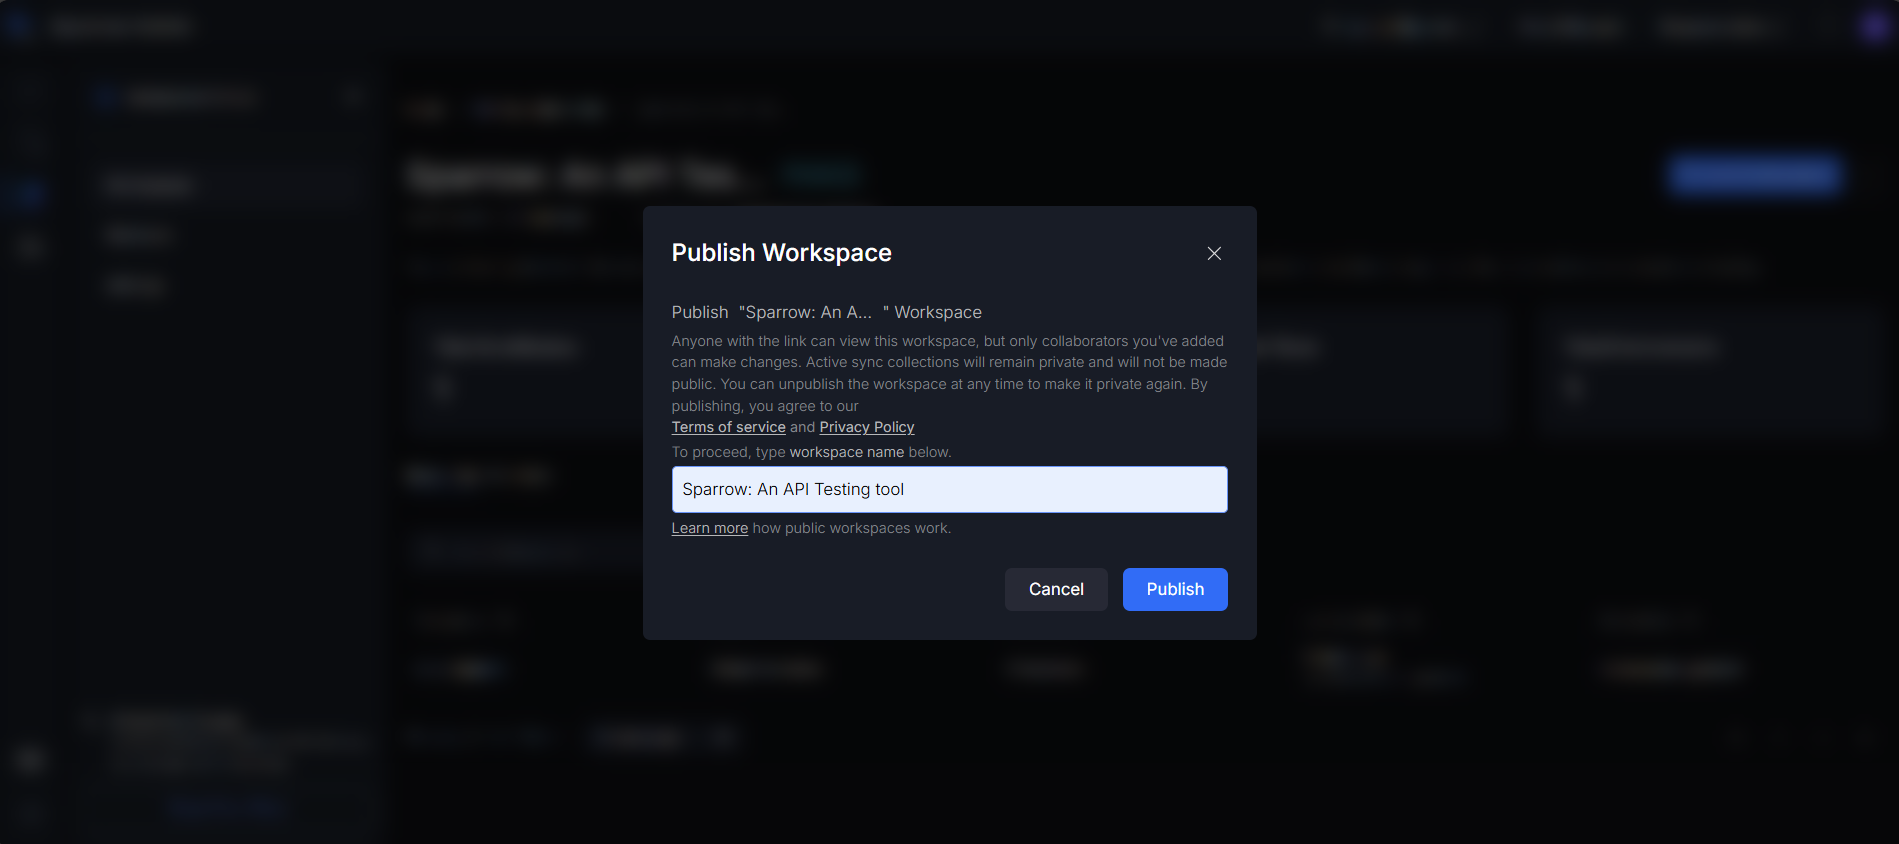
Steps to change Private workspace into Public workspace:
Step 1: Selecting 'Make it Public' will launch a confirmation modal, allowing users to proceed with changing the private workspace's status to public.
Step 2: To confirm that you wish to convert this workspace to public, type the exact name of the Workspace into the confirmation bar within the modal.
- Caution:
- You cannot add wrong name and try to make it public. It shows an error message if you have typed wrong name and trying to make it public. It shows Workspace name doesn’t match.
- You cannot Make your workspace public by leaving the Name bar empty. If you try to Make Public, it shows “Workspace cannot be empty. Please enter the workspace name.
Step 3: After Typing the correct Workspace name and clicking on Make Public, you get toast message for successfully making it public. The tag beside Workspace name changed from Private to Public.
If you failed to make it Public, Check and try again all the steps.
Step 4: Now the Make it public from the drop-down changes into Share Workspace. Clicking on Share workspace, it converts into Link copied. The Link to the workspace is successfully copied and can be shared anywhere.
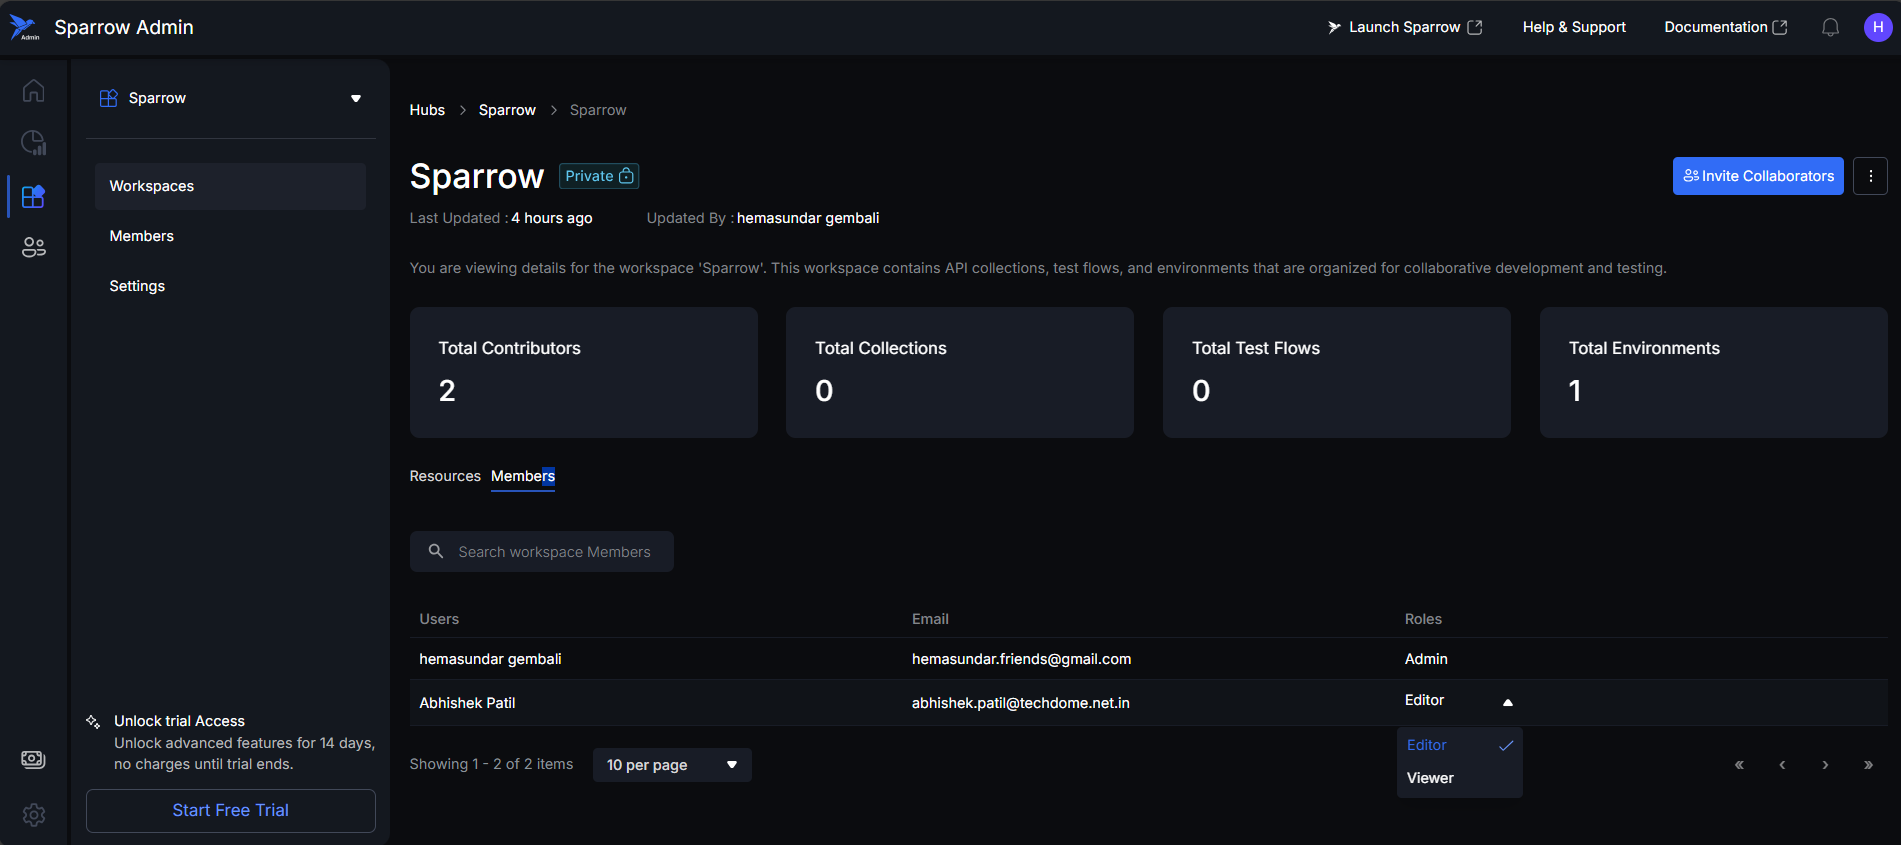
Manage Access
The Manage Access section allows admins and editors to control who can view or modify the workspace. They can add, remove, or update member roles such as Editor or Viewer. Only admins and editors are considered contributors since they have editing permissions, while viewers have read-only access. All members and their roles are displayed in the ‘Members’ tab for easy management.
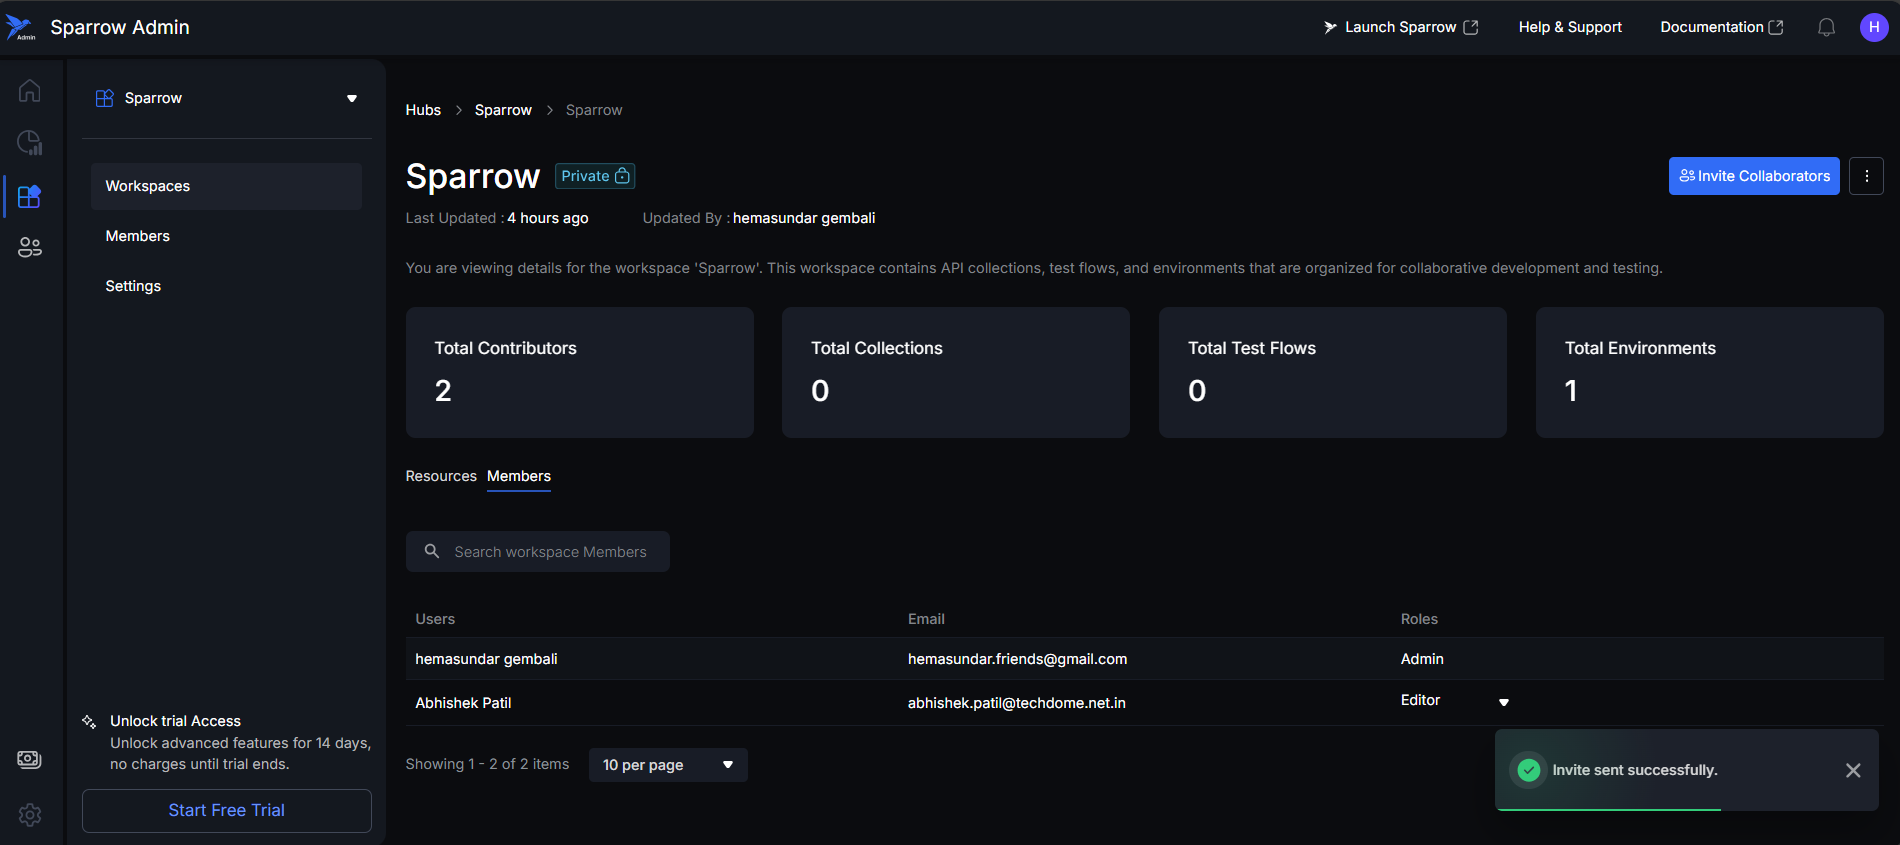
Inviting collaborators
Step 1: When you click on Invite Collaborators, a modal appears allowing you to add people and assign their roles.
- You can enter the email IDs of the individuals.
- Choose appropriate roles — Editor, or Viewer — based on your needs.
- Each role comes with its own set of permissions and access levels.
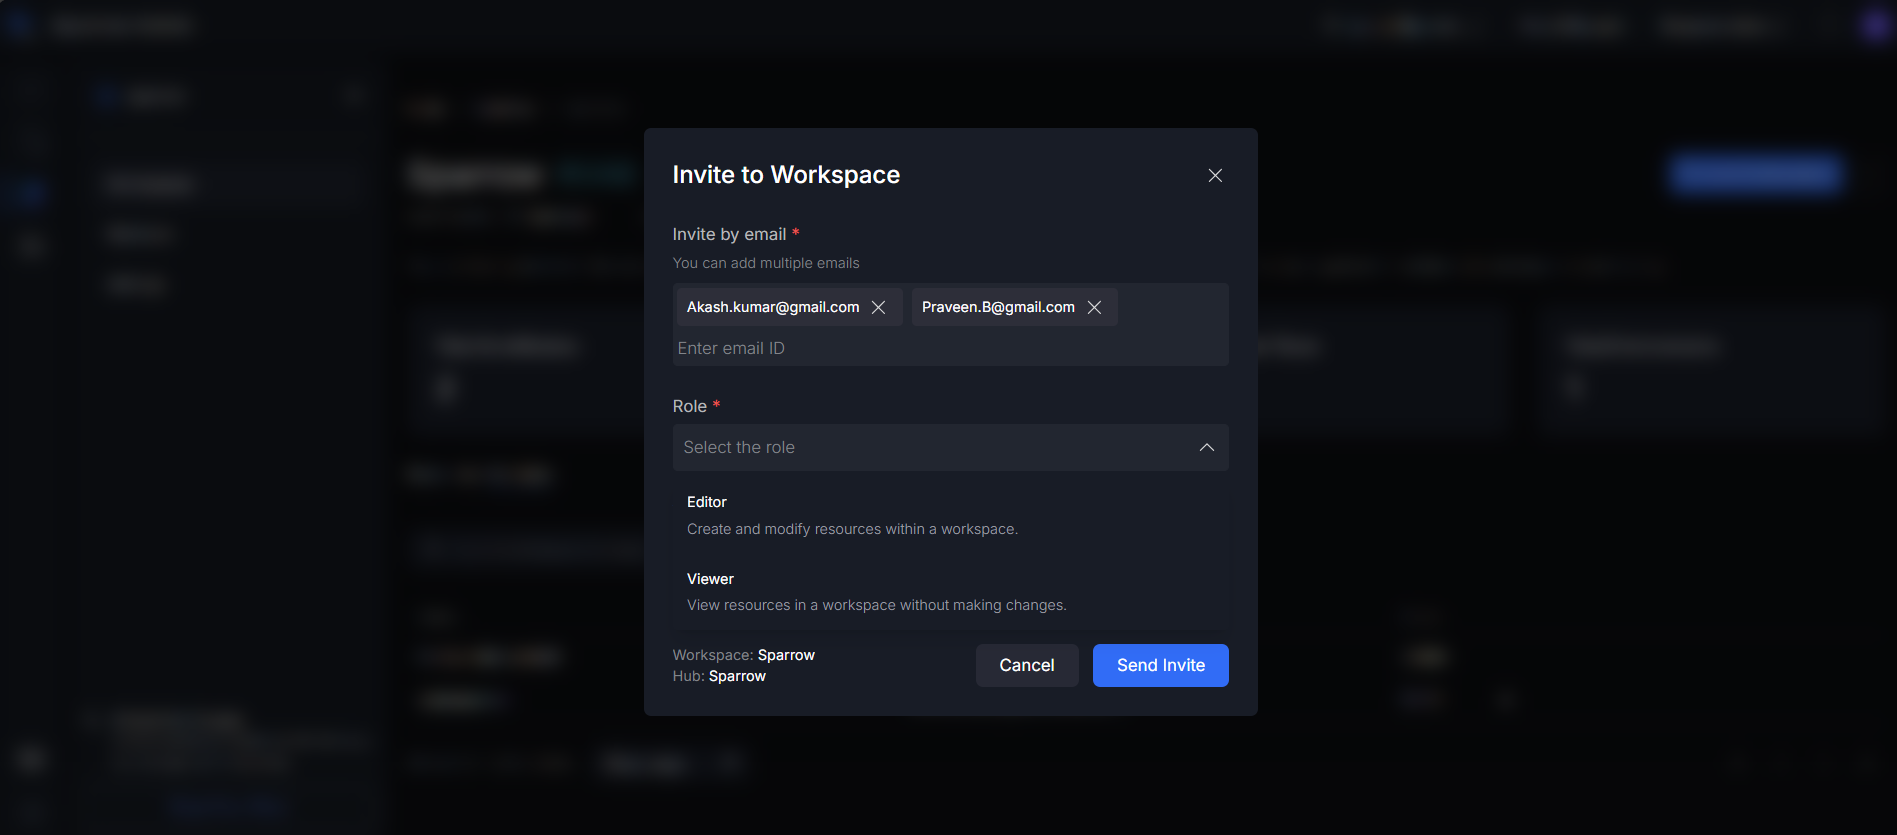
Step 2: Click on Send Invite button to send invitation for the Workspace to the respective emails. Upon selecting the invitation, they are added to Members of the Workspace.